Showing posts with label Halloween. Show all posts

Tuesday, September 18, 2012

No Sew Master and Commander Jack Aubrey Costume

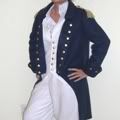
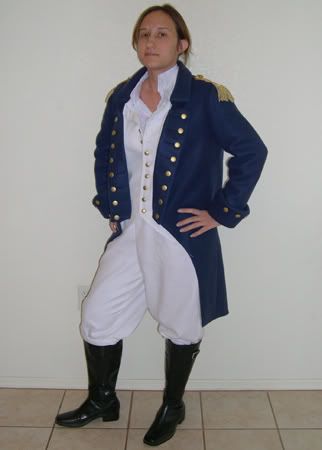
JoeRanger in his Jack Aubrey costume
JoeRanger's Jack Aubrey Costume
People sometimes tell me that, since they can't sew or don't have a machine, they can't make a costume. Well, this post proves that you don't have to sew to make a great costume!

JoeRanger, the creator of this costume, contacted me a few weeks ago to let me know that he had made a Jack Aubrey costume like mine for a party, only he did it with no sewing! I was impressed and asked if I could post about it here to give some ideas to others who might want to make a costume without having to sew. He said yes and sent me these photos.
Left: A reproduction Royal Navy uniform from DeborahLoughCostumes on Etsy. Right: JoeRanger's uniform and accessories.
It's not easy to find an inexpensive Royal Navy costume online. Most of them for sale out there are historically accurate reproduction uniforms meant for films or reenactors and cost thousands of dollars. I have a feeling that's way above the budget of most people who find this blog, who are looking for something inexpensive they can wear for a party, Halloween, a convention, etc. Most of the supplies JoeRanger used were scrap, thrifted or purchased on eBay; in total it looks like it cost him around $50.

Supplies
For Jack's uniform coat, he started with a 60/40 cotton/polyester tan trench coat ($9) and dyed it a dark royal blue with Rit liquid dye.
Costume before adding trim and buttons
He cut the trench coat to match the shape of Jack's coat which meant cutting away the lower front parts of the coat. I believe he folded the raw edges inside and glued them together with hot glue.
Costume with trim and buttons
The trim and buttons (plastic with anchors; $5 from eBay) were glued on as well. An alternative would be to use iron-on fusible tape to finish the edges, which could also be used to attach the gold ribbon trim.
Trench coat lining and excess pant material remade into a vest
For the pants, he found a pair of khaki pants for $4. He cut them off at the knee and used the extra to alter the liner that came with the trench coat so it looks like Jack's vest.

JoeRanger's progress photos
The shirt was an old dress shirt with fabric glued on the front, the boots were left over from a Han Solo costume ($30 on eBay) and he constructed the pistol and sword from scrap in his workshop.

Thanks for sharing, JoeRanger! I hope that these photos are enough to show those of you out there who want a Jack Aubrey costume that, if you're willing to get creative and put in some effort, you can find a way to make an inexpensive costume without having to sew.

Tuesday, November 01, 2011

Shrek Puss In Boots Costume

Photobucket

My only opportunity for dressing up this Halloween was at a friends "Trunk or Treat" event (that's where you trick or treat out of the trunk of your car). She and her husband were going as Shrek and Fiona so I decided to throw together a Puss in Boots costume. It only took me an afternoon and I think it could be easily adapted to put together a costume for a child. Here's what I did:

Hat - Purchased from a costume store. I sewed one side up and stuck in a yellow feather (you can't really see it in this picture). I also sewed on felt cat ears, though in the cartoon you don't actually see Puss' ears when he's wearing his hat.

Shirt - I got a cheap orange sweatshirt and used iron on adhesive to attach a yellow fleece patch to the chest and yellow stripes to the arms. It probably won't hold up to machine washing, but I only needed it to last for a night. The black cape was borrowed from an old costume belonging to my friend's child.

Gloves - I sewed peach "paw pads" on to some fuzzy white gloves. In the movies Puss often wears over-sized black leather gloves so those could be substituted.

Belt and Tail - The belt was my husband's, the sword was purchased from a costume store. To make the tail, I cut a long strip of the yellow fleece I used for the stripes on the shirt and used iron on adhesive to attach stripes of brown felt. I folded the fleece so the stripes were on the inside and sewed it shut, leaving one of the short ends open and rounding the other. I trimmed the edges, turned it right side out, stuffed it then sewed it to the belt.

Pants and Boots - The pants are khakis and the boots are left over from my Jack Aubrey costume.

Wednesday, November 04, 2009

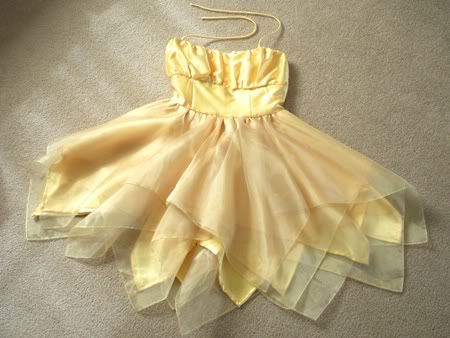
Wicked Costume: Glinda's Yellow "Emerald City" Dress


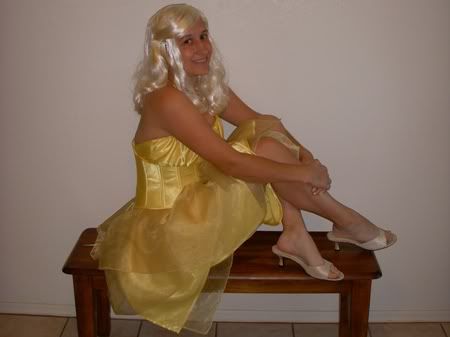
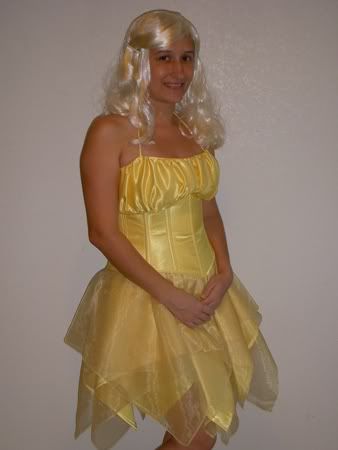
My Halloween costume this year was one of Glinda's dresses from the musical Wicked. Specifically, the yellow dress she wears to the Emerald City during the song "One Short Day."


First off, I have to give a big thanks to Corbyjane at the blog Pink Goes Good With Green! for her detailed post about this dress. Her collection of photos of this costume was a huge help! If you're not familiar with this dress, check out her post to see what I was trying to replicate.


Of course many of the trick-or-treaters that visited us on Halloween didn't recognize the costume. At first I tried to explain who I was but after getting a few odd looks I just said that I was a fairy!

The costume isn't a perfect match for the "real" Glinda dress but I think it's a pretty good replica considering I only spent about $30 and two weeks on it. It's missing the rhinestone and flocking embellishments of the original. I did buy rhinestones but ran out of time to glue them on and I couldn't figure out how to do the flocking. Hopefully if I figure it out, I can go back and add the embellishments to it later.

I'll cover each part of the costume in detail below.

***


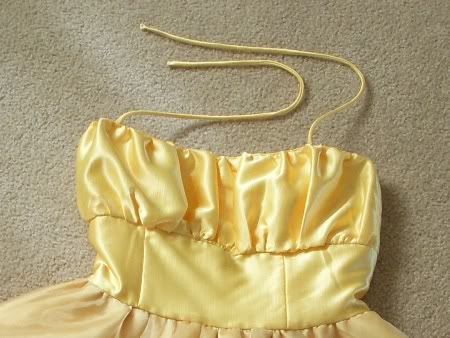
Project Name: Glinda's Yellow "Emerald City Dress" - Gathered Top
Time Taken to Finish: 2 days
Pattern: McCall 5380 Unfortunately this pattern has been discontinued, but I was able to find it on eBay for a pretty good price.
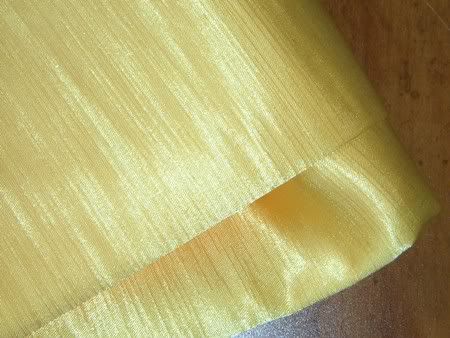
Materials Used: Yellow fabric with a sheen. I got lucky and found this fabric for $1.50 a yard in the clearance section at Wal-Mart. Here's a photo of the fabric up close:


You can see that the fabric has tiny little lines sewn into it. Cute!

What I Did: I followed the pattern closely (view A). The only change I made was to not connect the straps on the back - I tied them behind my neck instead. There is a zipper in the back of the dress, it continues down into the handkerchief skirt.
What I Liked About the Project: Having an actual pattern made this part of the costume easy to sew.
What I Didn’t Like About the Project: I really wanted the gathered part of the dress to be made of the same yellow organza that I used to make the outer layers of the skirt. I thought that was closer to how it was made in the original costume. Unfortunately after three attempts to make it with that fabric, I just couldn't get it to work. If I just gathered the amount of organza specified in the pattern it wasn't enough - the gathers were too far apart. I calculated that I would have to gather 8 yards of organza to get it the way I wanted and I didn't have that much fabric to spare! I made a few attempts at using an amount somewhere in between but it still didn't look right so I gave up and used the fabric I was using for the rest of the dress.

***


Project Name: Glinda's Yellow "Emerald City" Dress - Layered Handkerchief Skirt
Time Taken to Finish: 3 days
Pattern: I modified these instructions from the Weekend Designer blog
Materials Used: Three layers of yellow organza ($2 a yard at an odds-and-ends fabric store) and two layers of the yellow fabric that I used for the gathered top.
What I Did: Cut out the fabric into squares of different sizes and marked the center of each square. Piled them up with the smallest square on top and the largest on bottom, matching centers Rotated the layers around the center so they overlapped each other. Pinned the layers together at the center. Marked a circle on the top layer with a radius as suggested by Weekend Designer. Sewed a basting stitch through all the layers along that circle and then did it again about 1/2 inch outside that circle. Cut out the center of the circle, gathered the layers along the basting stitches and sewed it on to the gathered top.
What I Liked About the Project: This is a surprisingly easy skirt to make, it's just a lot of squares!
What I Didn’t Like About the Project: It's a little shorter than I would've liked but the length was limited by the width of the fabric I had (45 inches). If you wanted a longer skirt you would have to sew two widths of fabric together to make a bigger square.

***


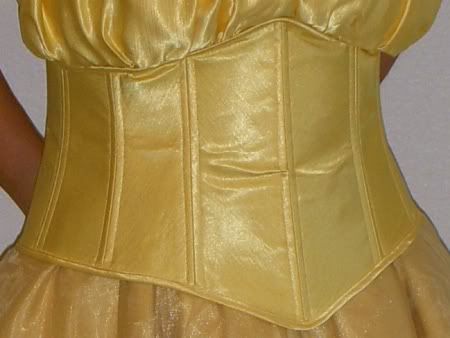
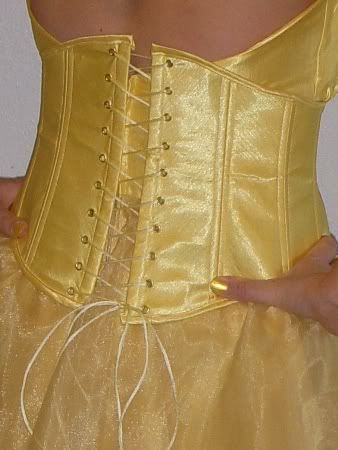
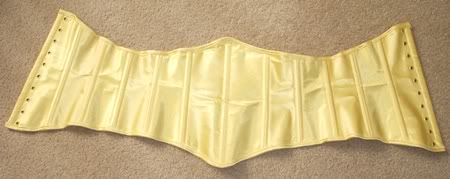
Project Name: Glinda's Yellow "Emerald City" Dress - Underbust Corset
Time Taken to Finish: 4 days
Pattern: Hand-drafted using these instructions from the Necromancer's Palanquin blog
Materials Used: yellow fabric, middleweight interfacing, 3/8" cable ties for boning, 5/32" gold eyelets
What I Did: After drafting the pattern, I cut out pieces from the yellow fabric for both the outside and the lining. I used some fusible webbing to attach the outside pieces to the interfacing. I sewed all the outside pieces together and all the lining pieces together. With the right sides of the outside and the lining facing each other, I sewed the two vertical edges together (along the edge where the eyelets will be going) and then turned it right side out. Next I basted the edges and then sewed 1/2" channels around each of the seams between the pieces. I inserted the boning and then used bias tape (made from the yellow fabric) to complete the unfinished edges. Finally, I put 10 eyelets on each side at the back.
What I Liked About the Project: This is the first corset I drafted by hand. It was pretty easy, it only took me about two tries to get the pattern right.
What I Didn’t Like About the Project: Making the bias tape myself was annoying but it was the only way to get it to match. I would definitely recommend using starch if you can when you're ironing the tape - it makes things a lot easier!

***

Glinda's Yellow "Emerald City" Dress - Accessories

The Wig:


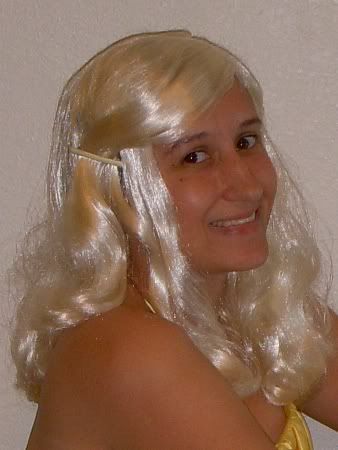
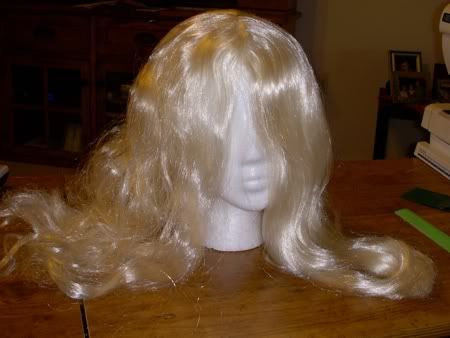
Originally I wasn't planning on wearing a wig, even though my hair is dark brown. But I got a haircut right before Halloween and my hair was way too short, I couldn't even curl it. I found this wig for sale for $6 at Wal-Mart. The color wasn't perfect (it was a little too white) but the price was right! I brushed it, cut it, and styled it with a curling iron on very low heat. You can see the difference this makes in the photo below. The hair on the right has been fixed while the hair on the left has not.


The Glasses:


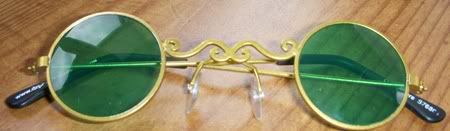
I didn't have $20 (plus shipping) to shell out for the authentic Emerald City glasses from the official Wicked store so I picked these up at a costume store. They're not the greatest, the lenses are far apart so they look kind of odd when you're actually wearing them.

Other Accessories:

I looked hard for some light-colored Mary Jane heels like Glinda wears but fall is just the wrong time of year to look for light-colored shoes! Instead I wore some old ivory heels that I bought to wear to a wedding a long time ago. I also tried to find a necklace and a purse like Glinda's but couldn't find anything close enough. I'll probably keep an eye out for all these things so I can eventually complete the costume.

Monday, November 17, 2008

Halloween Update 2: Saloon Girl, Bar Maid, and Chef Gordon Ramsay

This is my second post about the Halloween costumes I made this year - you can see my first post about the Witch, Princess Leia, and Jedi costumes here.

...


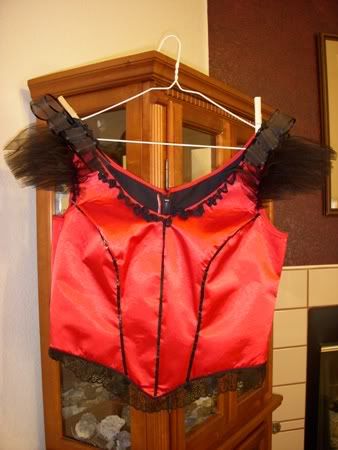
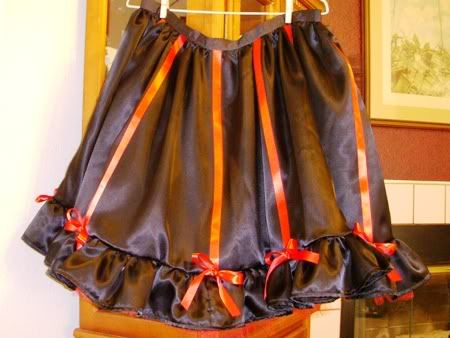
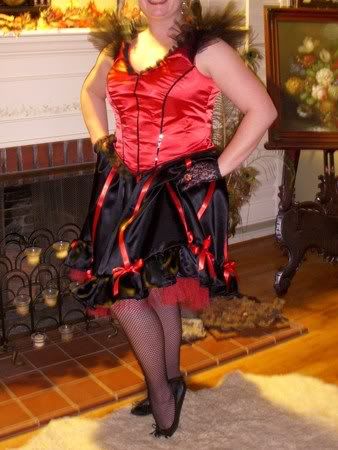
Project Name: Saloon Girl
Time Taken to Finish: 3 weeks
Pattern:
Simplicity 2851
What I Did: This was by far the most challenging costume to make. It was constructed from satinette which I have no experience sewing. That made the bodice very challenging because it was difficult to get the satinette to lay flat and match up with the lining pieces. I actually ended up throwing away my original pieces cut from the satinette and buying more fabric, which I then attached to some fusible interfacing before cutting out the pattern pieces. That made everything much easier!
...


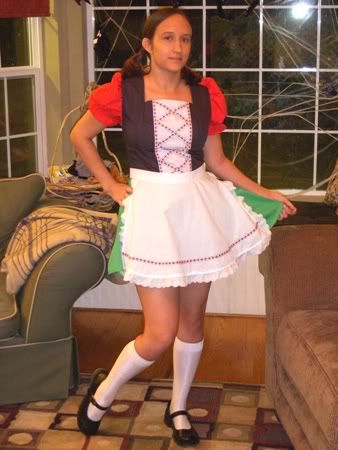
Project Name: German Bar Maid
Time Taken to Finish: 1 week
Pattern: Simplicity 2789 (Update 9/8/09: This pattern is now out of print. The closest I could find is Simplicity 4015, View B, Little Red Riding Hood. Take off the hood and change the colors and it would resemble this costume, though it doesn't have the bloomers).
What I Did: This costume was quick and easy (just what I wanted!). I followed the pattern and didn't have any major problems with it.
...


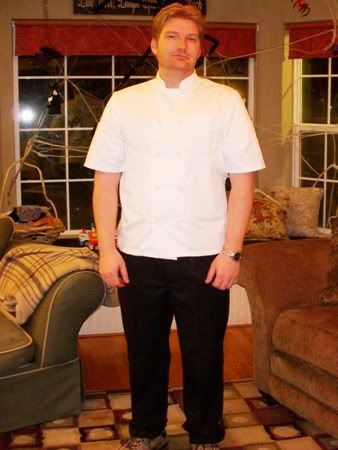
This is my husband as Chef Gordon Ramsay (or just a chef to those who don't know who Chef Ramsay is!). I had planned to sew the chef's jacket myself using this pattern but I ran out of time. Happily, I was able to find a reasonably priced jacket at Chefwear.com. Also nice was that 2 day shipping was only a couple more dollars than the standard shipping so I was able to have it well before Halloween.
...

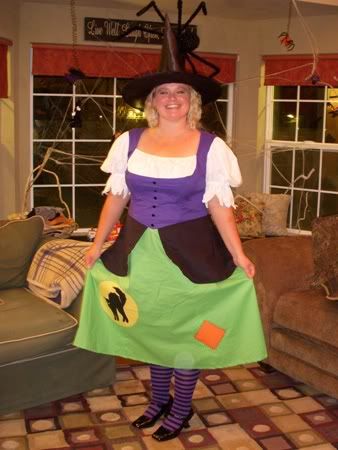
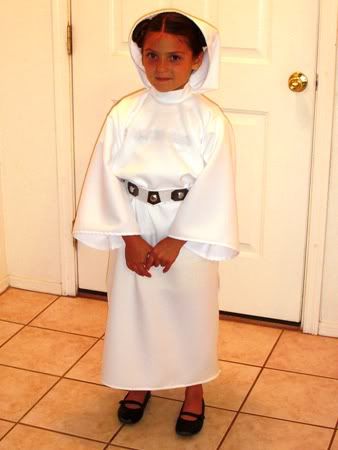
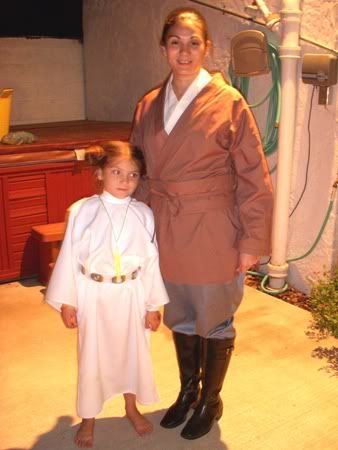
And are some photos of the costumes from my last post being worn (I've also added them into that post):


Witch


Princess Leia


Princess Leia and Jedi

Tuesday, September 30, 2008

Halloween Costumes Update 1: Witch, Princess Leia, Jedi

Update 11/17: I've added in photos of the costumes being worn. You can see my second post about the Saloon Girl, Bar Maid, and Chef Gordon Ramsay costumes here.
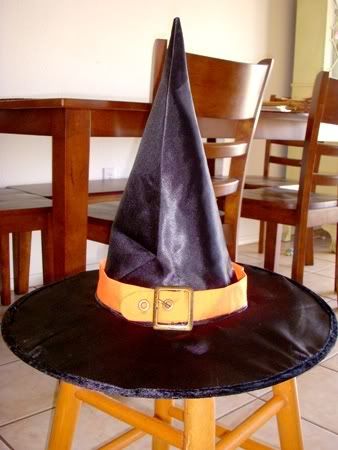
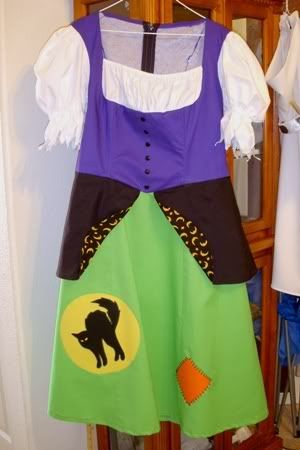
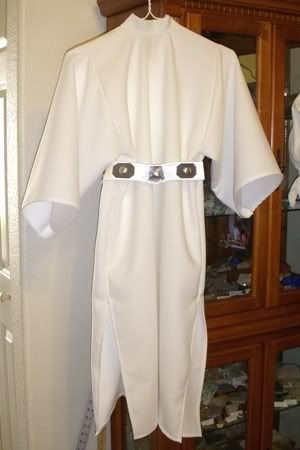
I've been a little busy lately because of my attempt to sew seven costumes for Halloween this year (only one is for myself, the rest are for friends and family). So far I've finished three, all of them for friends: a cute witch dress, a child's Princess Leia dress and belt, and a Jedi outfit. Here are some preliminary photos and descriptions of the projects (I'll have photos of the costumes on their wearers after Halloween).

Project Name: Witch Dress and Hat
Time Taken to Finish: 1 week
Pattern: Simplicity 2803 (Update 9/8/09: This pattern number has changed to Simplicity 2521)
What I Did: This costume was sewn pretty much according to the pattern. For the peplum (the black thing around the waist) I ended up having to put an extra layer of black under the outer layer to keep the printed inner layer from showing through. For the hat I sewed a little orange belt and attached a buckle, then sewed it to a standard witches hat.
...
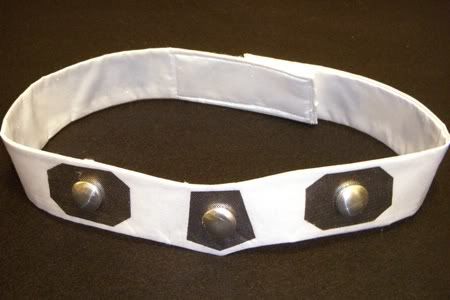
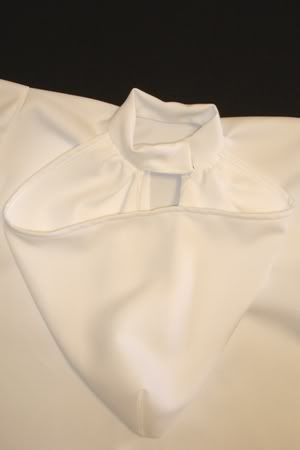
Project Name: Child's Princess Leia Dress and Belt
Time Taken to Finish: 4 days
Pattern: Simplicity 4797
What I Did for the Dress: I started with an angel costume from the Simplicity pattern to figure out the size. I altered it so that the body of the dress was all one piece with the only seams being under the arms (there were no shoulder seams). I altered the neck to add a Mandarin collar with a velcro closure and a keyhole opening below the closure to make room for it to go over the head. I made a hood and sewed it into the neck seam on either side of the closure. The sleeves had to be shortened a lot and the extra angel "flaps" were removed (I probably should've started with the standard sleeves, it would've saved me some time!). I left the side seams of the dress unsewn from the knee down to make slits (I did do a little hem on the raw edges).
What I Did for the Belt: I made a pattern out of newspaper for all the pieces based on the belt information at Obi-Wan's Jedi Academy. For the body of the belt I used two pieces of white costume satin with a thick piece of interfacing in between and velcro sewn at either end for closure. For the metal octagons and petagon I used silver fabric attached with fusible webbing. I then hot-glued 3/4 inch button blanks on top of the silver shapes.
...
Project Name: Jedi Costume
Time Taken to Finish: 1 week
Pattern: tunic: Simplicity 5840 pants: McCall 2233
What I Did: This is sort of an "early Obi-Wan" costume (no robe!). The Simplicity pattern did not come with a pattern for pants so I borrowed one from a McCall pattern I had handy.
...
Sewing so many different costumes has been hard work but I'm also learning a lot. I have four more costumes planned: saloon girl, Chef Gordon Ramsay, Heidi/German bar maid, and Gary Cooper from High Noon. The last one is for my dad and might not get finished before Halloween, but he's said he can wait.

Thursday, November 01, 2007

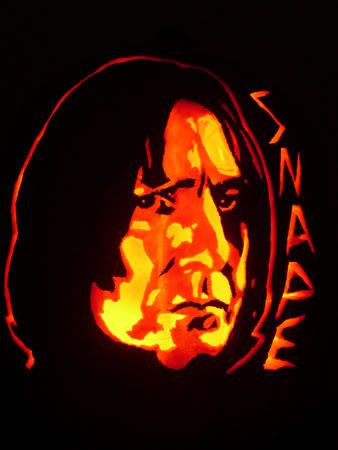
Severus Snape Pumpkin

In honor of the release of the final Harry Potter book this year I decided to carve Professor Severus Snape (as portrayed by Alan Rickman).


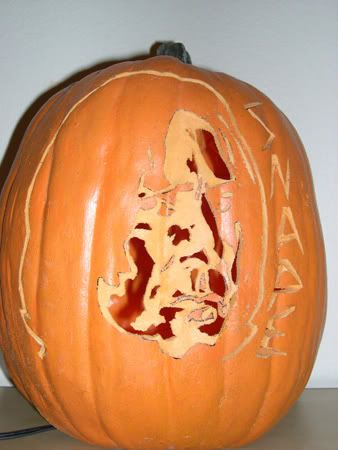
Here's the unlit pumpkin, just so you know it's not a Photoshop job:


Last year I did a Jack Sparrow Pumpkin. I think this year's is a bit better. One reason may be that I followed some online instructions on how to make a pattern with Photoshop (instead of making up my own by hand). Another reason may be that I used a Funkin (an artificial carvable pumpkin) instead of a real pumpkin. The carving wasn't really any easier, especially since the "flesh" of the Funkin was thick, hard foam. To get the intermediate shade (orange), I had to cut open the back of the pumpkin and spend several hours with a Dremel tool to make the "flesh" thin enough for light to shine through. Despite the extra work, I think the Funkin gives a cleaner result and best of all it doesn't rot!

Jack Aubrey Costume


Jack Aubrey costume with jacket
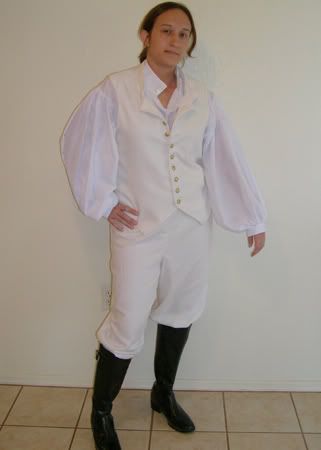

Jack Aubrey costume without jacket

Here's the details on the Jack Aubrey costume that I wore to our Halloween party. I made this costume based on the everyday uniform worn by Russell Crowe in the movie Master and Commander: The Far Side of the World. I made everything but the boots from scratch. Below, I'll cover each part of the costume individually.

Update 5/22/08: If you're interested in more costumes from the Master and Commander movie then please check out my photos and drawings of several outfits on display at the Maritime Museum of San Diego.

Update 9/18/12: Check out some photos of a no-sew Jack Aubrey costume here.
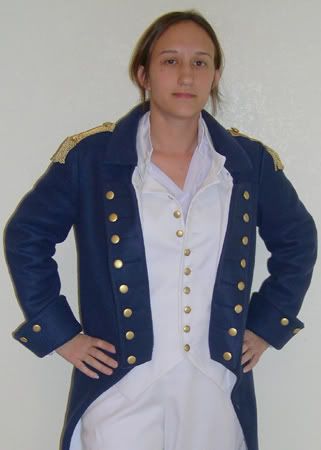

Jacket

Project Name: Jack Aubrey costume - jacket
Time Taken to Finish: 2 weeks
Pattern: Modified from McCall's 4626, size Men's Small *(See update at bottom of page)Materials Used: Blue polar fleece, cream heavy weight cotton knit (for lining, same fabric used for vest and pants), 3/4 inch buttons, gold fabric, gold fringe, fusible interfacing, blue and gold thread
Special Tools Used: Singer 221K sewing machine
What I Did: So that it would resemble Jack's jacket, I modified the McCall's pattern by adding the fold-over lapels (where the buttons are) and removing part of the jacket below the lapels. I made the epaulettes (shoulder decoration) separately and sewed them on at the end. The buttons were cheap white ones that I spray painted gold (the same with all the other buttons in the costume).
What I Liked About the Project: Of all the costume pieces, the jacket took the longest to make but I think it turned out great. It was surprisingly comfortable.
What I Didn't Like About the Project: The weight of the lapels often caused them to roll back and show the lining of the jacket. The epaulettes could have been a little bigger. I wanted to use real brass anchor buttons but it would've cost me around $40 to get them. The spray painted buttons look fine, but those on the sleeves are already starting to get scratched.
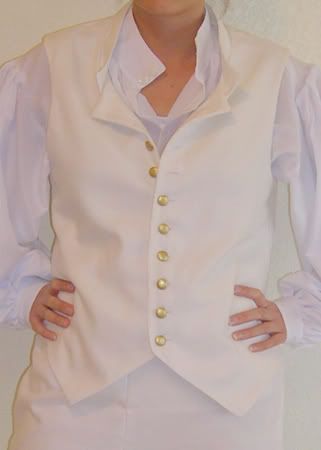

Vest

Project Name: Jack Aubrey costume - vest
Time Taken to Finish: 1 week
Pattern: Modified from McCall's 4626, and McCall's 4864 size Men's Small *(See update at bottom of page)
Materials Used: Cream heavy weight cotton knit, 5/8 inch buttons, fusible interfacing, cream thread
Special Tools Used: Singer 221K sewing machine
What I Did: I started with the pirate vest (McCall's 4626) and modified the pattern by giving it a high neckline. I did that by adding the neckline from the McCall's 4864 colonial jacket pattern to the pirate vest pattern. I also made the vest significantly shorter. Since I don't have a buttonhole maker, I originally considered using sew-in snaps hidden under the buttons. But the snaps could not be hidden well, so I broke down and made real buttonholes by hand.
What I Liked About the Project: Considering that I had never sewn a buttonhole of any kind before, I think they looked very good.
What I Didn't Like About the Project: I wish that I had used sew-in interfacing instead of fusible interfacing. The fusible interfacing under the buttons caused the fabric to ripple. Since the vest was lined in the same fabric as the outside, I was able to turn it so that the ripples were on the inside.
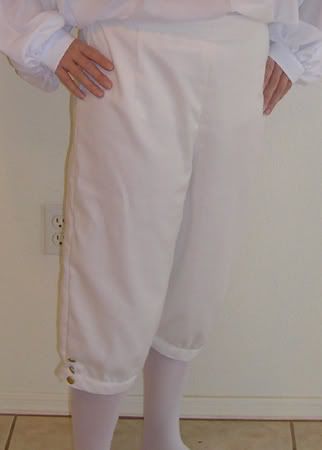

Pants

Project Name:
Jack Aubrey costume - pants
Time Taken to Finish: 2 days
Pattern: McCall's 4864 size Men's Medium *(See update at bottom of page)
Materials Used: Cream heavy weight cotton knit, 5/8 inch buttons, fusible interfacing, cream thread
Special Tools Used: Singer 221K sewing machine
What I Did: I sewed the pants according to the pattern. The only change I made was in the number of buttons on the legs of the pants.
What I Liked About the Project: It was fast! The pants were the easiest part of the costume to make.
What I Didn't Like About the Project: I should've made the small size instead of the medium, because I had to pin the pants to keep them sitting at my natural waist. Since the pants were white-colored and unlined, they were practically see-through so I had to wear white tights underneath them. Even then you could still see the tucked-in shirt tail clearly through the pants.
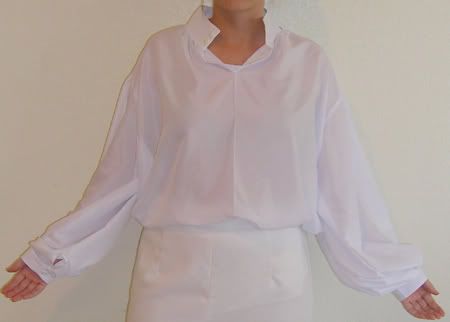
Shirt

Project Name: Jack Aubrey costume - shirt
Time Taken to Finish: 3 days
Pattern: McCall's 4864
size Men's Small *(See update at bottom of page)
Materials Used: White light weight polyester, 5/8 inch buttons, sew-in interfacing, white thread
Special Tools Used: Singer 221K sewing machine
What I Did: I also sewed the shirt according to the pattern. Again, I hand-sewed the buttonholes on the neck and wrist.
What I Liked About the Project: The fabric is light and comfortable.
What I Didn't Like About the Project: The shirt was the last thing I sewed and I did not have time to figure out how to add ruffles to the neck (as Jack's shirt has). Also, the shirt tail needs to be made shorter because there is too much to tuck in.
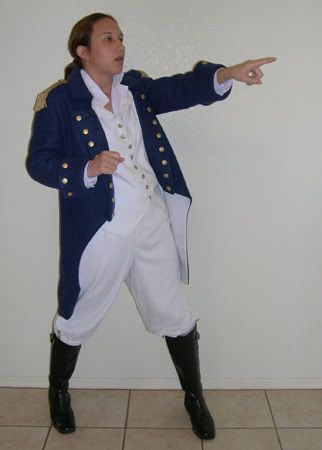
Captain Aubrey in action!
* Update 8/22/08: I just found out that McCall has discontinued both of the patterns I used in my costume (4626 and 4864). They're still available in the "Out of Print" area of their website but I'm sure they won't be around much longer. However, I recently ran across Butterick pattern B3072 which is really a better match for all the pieces in the costume than the McCall patterns. The Butterick pattern has the jacket, vest, shirt and pants all in one package. If you're looking to make your own Jack Aubrey costume I would definitely suggest starting there!
Update 10/4/08: I've uploaded several high resolution close-up photos of the jacket. You can see them here:

Gregory House Costume

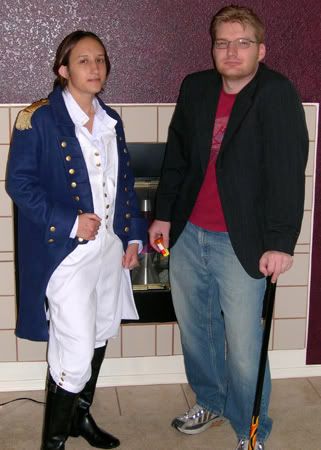
Kevin and I hosted a Halloween party this year, which gave me an excuse to wear a costume!  I went as Captain Jack Aubrey (Russell Crowe in the movie Master and Commander: The Far Side of the World).  Kevin went as Dr. Gregory House from House MD


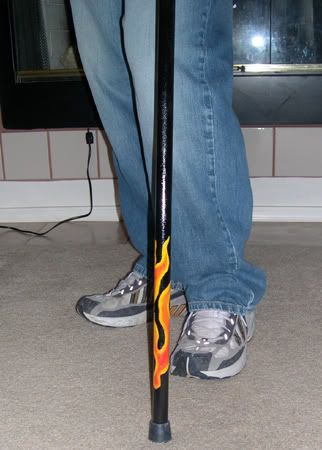
The Gregory House costume was pretty simple since Kevin already had the jacket, shirt, jeans, and sneakers.  For House's Vicodin, I got an old pill bottle and put Tic-Tacs in it.  The only part of the costume I actually made was his flame cane (see project description below).  I searched all the area thrift stores trying to find a wooden cane but no luck.  The drug stores had metal canes but they were expensive.  They actually sell the real flame cane online at several cane stores (only about $25) so if I had the time I guess I could've ordered one.  But since Kevin was only going to use it for one evening it wasn't really worth it!


Project Name: Gregory House's flame cane
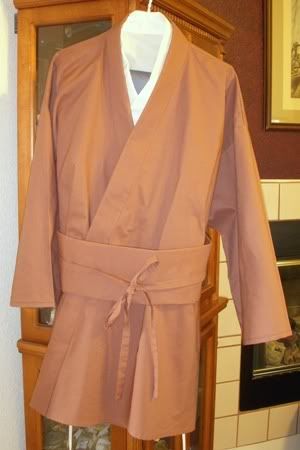
Time Taken to Finish: 5 hours (not including drying time)
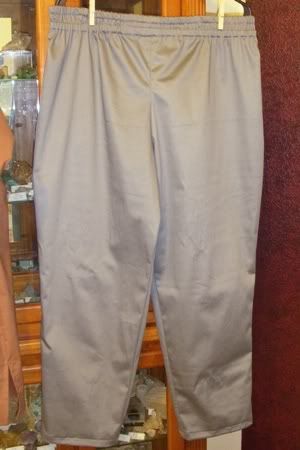
Materials Used: A 7/8 inch wooden dowel (cut to the correct length for Kevin), a ping pong ball, a black 7/8 inch rubber chair tip/foot, black spray paint, clear coat gloss spray paint, acrylic gesso, red, orange, and yellow acrylic paints, white glue
Special Tools Used: drill, paint brushes
What I Did: To make the knob on the top of the cane, I cut a 7/8 inch hole in the ping pong ball with the drill.  It was hard to do and the hole was a little ragged but it was adequate.  I put a generous amount of white glue on one end of the dowel and stuck the ping pong ball over that end.  I then spray painted the whole thing black.  Once the spray paint dried, I used chalk to draw the flame decal on the lower end of the dowel.  I then painted in the chalk outline with gesso (basically a white primer).  Without the gesso, the black would've shown through the yellow on the flames.  Then I painted the flames over the gesso.  I let that dry and then gently wiped it down with a wet paper towel to remove the chalk and other debris.  Next I spray painted the whole thing again with several coats of the clear gloss.  I let it dry overnight, then added the rubber chair foot.
What I Liked About the Project: I think the flames turned out alright, considering I painted them at about 11 p.m.
What I Didn't Like About the Project: I really would've preferred a "crook" cane (hooked top like a candy cane) for accuracy, but they were too hard to come by and, with my experience, would've been impossible to make!

Since the Jack Aubrey costume was so complicated, I think I'll give it it's own post.

P.S. - If anyone noticed our blooper, Kevin has the cane in his left hand but House actually holds his cane on his right.  But since I have never seen Kevin wear so much as a funny hat, his wearing a full costume was a unusual event and I wasn't going to push it by telling him to switch hands!

Related Posts with Thumbnails