
Note: This is the third of three posts about how I made my felt Advent calendar. For information on how I came up with the idea see Part 1; for information on how I made the ornaments see Part 2.
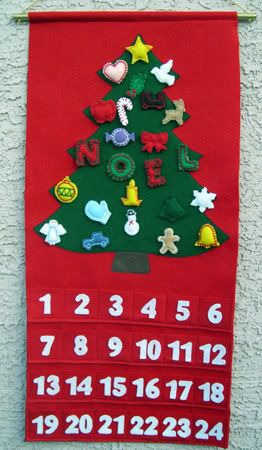
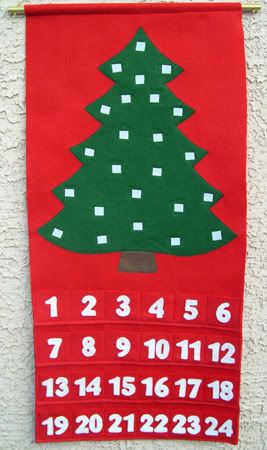
The completed Advent calendar
I've included instructions below if you're interested in making your own calendar. If you have any questions feel free to contact me or leave a comment. And if you make a calendar let me know - I'd love to see photos!
Supplies for the calendar:
- 1 yard red felt
- 1/2 yard green felt
- scrap of brown felt
- sew-on Velcro (the prickly side)
- white, red, green, and brown thread
- white felt pre-cut numbers (Numerals should be about 1 inch wide by 1.5 inches tall. If you're like me and don't have access to pre-cut numbers, you can cut out your own using sheets of white felt and number stencils.)
- felt glue (I used Beacon's Felt Glue)
- 3/8 inch diameter dowel, cut to 18 inches long
- spray paint, gold or other Christmas color
- cord, gold or other Christmas color (will need about 2 feet)
- old newspaper
- transfer webbing (Optional but recommended. This is an adhesive webbing that helps the tree stick to the background. If you can't find this, you can use felt glue.)
Tools for the calendar:
- sewing machine (Recommended, but it could be done without one)
- rulers and/or yardstick
- scissors or rotary cutter
- chalk or other removable fabric pen or pencil (for marking on the felt)
- pins
- drill
In making my calendar I also created my own ornaments that attach to it using Velcro. If you do not want to make your own ornaments you could buy ornaments and attach Velcro to them. You could also buy ornaments with loop hangers on them and hang them from buttons, bells, or beads sewn to the calendar in place of the Velcro.
For help making your own ornaments, please view Advent Calendar Part 2 - Ornament Instructions. For information on my inspiration for this calendar, please see Advent Calendar Part 1 - The Plan.
Instructions for the Advent Calendar:
1. Cut out the body of the calendar. Cut out a piece of red felt that is 34 inches long by 15.5 inches wide. This will be the body/background of the calendar. Be careful that your cuts are straight, as the edges of the calendar will be unfinished. This is where a rotary cutter might come in handy!
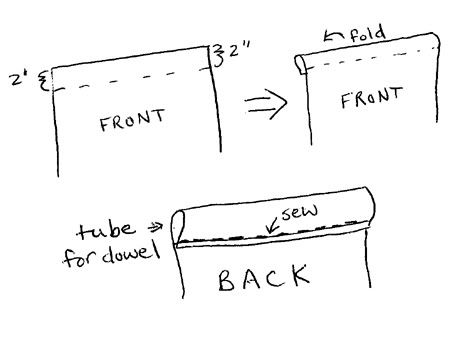
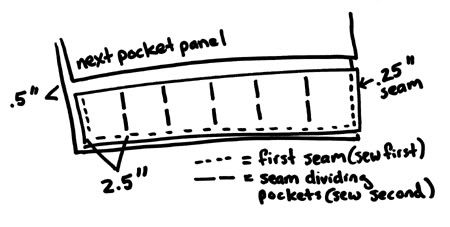
2. Make a tube for the dowel (see diagram). Measure and mark two inches from the top of the calendar. Fold the top backwards to the mark to make the tube. Pin the top in place and then sew the tube closed.
2. Cut out the panels for the pockets. Cut out 4 pieces of red felt that are 15.5 inches long by 2.5 inches wide. These will become the pockets of the calendar.
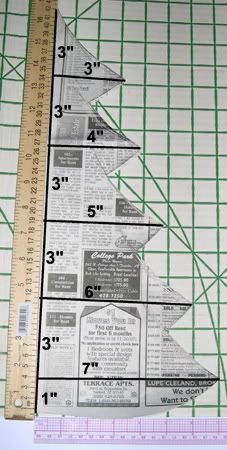
3. Make a pattern for the tree. Take a folded sheet of newspaper and measure 16 inches along the fold, marking each end. From the top, mark every three inches until you have 5 marks. You should still have one inch between your fifth mark and the bottom. Each mark will be one "branch" along the side of the tree. At the first mark, draw a line 3 inches long, perpendicular to the fold. At the next mark draw a line 4 inches long. Continue drawing lines at the marks one inch longer than the last until you have made a 7 inch line at the fifth mark. Now draw in the outline of the half tree. While the newspaper is still folded, cut along your outline. If you're confused, I think the image below pretty much explains this entire step:
4. Open up the tree pattern and pin it to the green felt. Cut out the felt tree.
5. Using the brown felt, cut out a stump for the tree. It should be about 3.5 inches wide by 1.5 inches high.
You should now have the main pieces of your calendar ready:
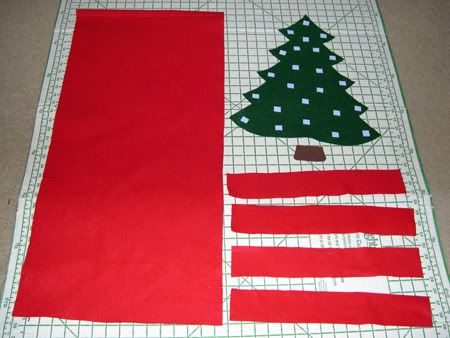
(Don't worry about the Velcro yet - I took this photo after completing step 8.)
6. Make sure everything fits. Arrange the pieces on the body of the calendar to make sure that there is room for all of them. The bottom pocket panel should line up with the lower edge of the body and each subsequent panel should be placed 1/2 inch above the last. The tree and stump should fit between the top pocket and the tube for the dowel. If your tree is too big, you will need to remake it so that it fits. If everything fits, keep the tree piece out and put the rest aside.
7. Cut and position Velcro on tree (If you are going to use buttons/bells/beads instead of Velcro on your tree, you may skip to step 9.) Cut 24 small squares of Velcro. Save the fuzzy sides for the ornaments, and arrange the prickly sides on the tree. Space them as far apart as possible, but leave room for sewing around the edges of the tree. Once you have the Velcro squares where you like them, pick them up and mark their position with a chalk dot.
8. Sew the Velcro on the tree. Using the sewing machine, sew a square of Velcro over each chalk dot. Trim the thread ends neatly.
9. Sew the pockets to the body of the calendar. Line up the first pocket panel with the bottom of the calendar body and pin it in place. Using the sewing machine, start at the top right corner of the piece and sew a 1/4 inch seam down the right side, across the entire bottom, and back up the left side. Leave the top of the pocket open. During this step, the felt in the pocket piece may stretch so that it hangs over the edge of the body. If this happens, just trim the excess.
Starting at the left seam of the pocket panel, measure and mark a vertical line every 2.5 inches. Sew along each line to create six individual pockets.
Repeat step 9 for the other three pocket panels. Be sure to place the bottom of the next panel 1/2 inch above the top of the panel underneath it. When marking the individual pockets, check to see that they line up with the pockets underneath them.
10. Use felt glue or transfer webbing to attach the tree to the body of the calendar. I didn't use glue so all I can suggest is to apply it thinly on the back of the tree and position it carefully on the calendar. If you want to use transfer webbing, here are the instructions:
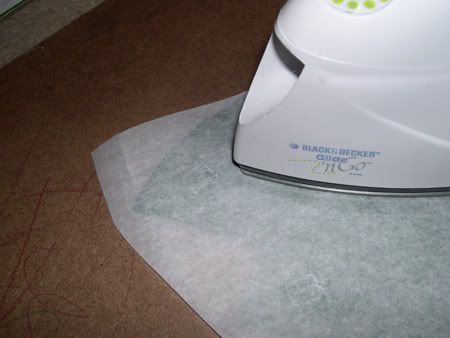
Following the instructions that came with the webbing, use a dry iron to attach the rough side of the webbing to the back side of the tree. Since the Velcro makes the back of the tree uneven, make sure you press into all the crevasses:
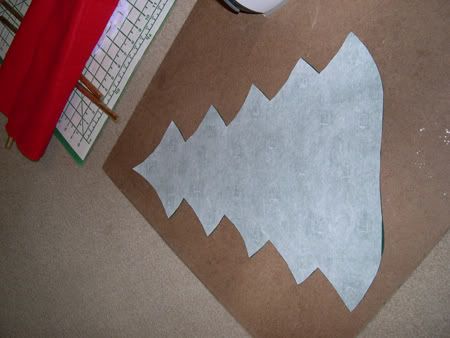
Next, trim the paper from the webbing so that it is the same shape as the tree:
Peel the paper from the webbing:
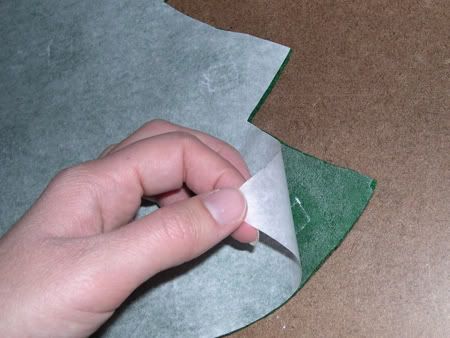
If the webbing does not separate from the paper, go over the area again with the iron.
Position the tree on the calendar body, webbing side down. Make sure it is exactly where you want it. Get a thin clean towel and wet it thoroughly. Wring it well so there is no excess water. Place the towel over the tree and iron slowly:
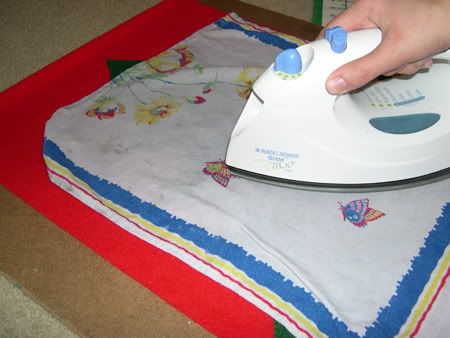
The water from the towel will cause the webbing to stick to the calendar body. Iron through the towel over the entire tree. Re-wet the towel if needed. Check to make sure that all parts of the tree are sticking to the body. If a part is not sticking, go over it again with the towel and iron.
11. Repeat step 10 to attach the stump below the tree.
12. Sew the edges of the tree and stump to the calendar. To reinforce the glue or webbing, use your green and brown thread to sew around the edges of the tree and stump. Sew as close as possible to the edge of the felt. Trim thread ends neatly.
12 1/2. If you decided to use buttons, bells, or beads to hang the ornaments, this would be the time when you could sew 24 of whichever to the tree.
13. Glue numbers to the pockets. If you need to cut out the numbers, use the stencils and white felt to do so. You will need the following amounts of each number:
1 = 13
2 = 8
3 = 3
4 = 3
5, 6, 7, 8, 9, 0 = 2 each
When you are ready to glue your numbers to the calendar, position them all on their appropriate pocket to make sure you have them in the correct place (Once the glue has dried they will be extremely difficult to remove). Use a toothpick to spread a thin coat of the felt glue over the back of each number. Smooth the number into place on the pocket.. Don't press too hard or the glue will smoosh out the sides. Once the numbers have dried carefully re-glue any loose edges.
14. Make the hanging apparatus for the calendar. If you haven't already done so, cut the dowel so it is 18 inches long. Drill a hole through the diameter of the dowel 1/2 an inch from each end (the hole needs to be big enough for your cord to pass through).

Sand any rough spots from the dowel. Spray paint the dowel. After it dries, put the dowel in the tube on the calendar. Run the cord through the holes and tie a knot in each end.
14. Ta-da, you're finished with the calendar! For help making ornaments, please view my Advent Calendar Part 2 - Ornament Instructions.


10 comments:
Hello,
I really love your adent calendar and am trying to make one. Thanks so much for the instruction! Is it alright to put a link to your instruction site in my blog?
Ulli
Thanks! Sure, you can put a link to my instructions on your blog. Send me a link to your post when you have it up - I'm interested in seeing what you have to say. :)
I finally managed to get the post about the advent calendar together. Here the link so you can check it out
http://muffinsnmore.blogspot.com/2008/11/first-of-advent.html
Have a great advent
Ulli
I just read your post - awesome! I left you a comment there too. :)
Just what my daughter wanted sometime from her childhood for her children to enjoy
I hope the next generation has as much fun growing up with these calendars as my generation did. :)
Comment from zookeeper: "PERFECT! My mother has a very very similar advent calendar and it's been my desire to replicate it, too. This is the perfect inspiration I needed to try and get it done this year!"
Zookeeper I screwed up and accidentally deleted your comment, so sorry! Thankfully I had it saved in the email notification so I'm posting it here. Good luck on your calendar!
Anonymous posted this on the "Contact Me" post: "I had the calendar for my children my mother in law mad 33 years ago...now my grandchild has it...do you know if the kit is still availabel and where the original kit came from?"
Bucilla was the original maker of the kit. They still make advent calendar kits (Google "Brucilla advent calendar kit") but they do not look like the ones from the 1970's-1980's. The original kits come up for sale on eBay occasionally, but they go a lot - like $100. That's why I decided to design my own calendar and put instructions online, so others could make their own advent calendars as well.
I have been looking for this exact advent calendar for a few years now. In 1978 I made one for my son and it was lost in my house fire back in 2004. Now I can make another one just like that one! Thank you so much! Deb
Made this due to your very clear instructions. The only thing I changed was when I machined the pockets I sewed the strips on and then machined down the whole calendar to complete the pockets
Post a Comment