Tuesday, December 06, 2011

Free Christmas Craft Instructions 2011

I thought I'd do a quick post reviewing the Christmas craft instructions and patterns from The Crafty Cattery. If you're looking for gifts to make for yourself or someone else, consider these!

Amigurumi Nativity Crochet Pattern. So far it's just Mary and baby Jesus and Joseph but I plan to release a new pattern each year for another figure in the Nativity.

Felt Advent Calendar. Includes instructions for making the calendar and ornaments. No patterns for the ornaments, unfortunately. You're on your own with those!

Christmas Card Holder. Instructions for making a very simple string and clothespin card holder.

Peppermint Felt Tree Skirt. Instructions for making a simple tree skirt.

Instructions for furoshiki, the Japanese art of wrapping gifts in cloth. Great for reducing wrapping paper waste.

Not really Christmas themed but these still make good gifts:

Big Bad Wolf Amigurumi Pattern. Crochet a little friend for the wolf lover in your life!

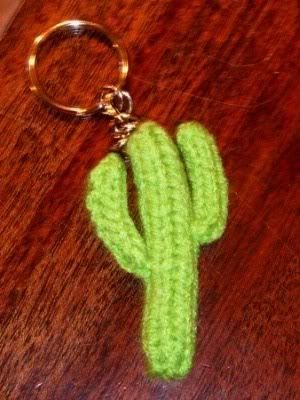
For, um... that person who always wanted a knitted saguaro cactus keychain?

 Instructions for a crocheted kimono-style baby sweater.
Printable Office paper dolls. Free PDF paper dolls of Michael Scott with desk, Dwight, Pam, Jim, Kelly and Creed. Make great stocking stuffers!

Tuesday, November 29, 2011

My Five-Year Craft Blogging Anniversary

My first craft post
With all the craziness of NaNoWriMo this month, I missed my five-year craft blogging anniversary on November 14th. I will have to go buy myself something made of wood (the 5th anniversary gift) to celebrate!

I counted it up and discovered that I have made 128 posts over those five years. It doesn't seem like much, but I never set out to be a high-capacity blogger. My goal with The Crafty Cattery has been to make every post useful (or at the very least, interesting) and I think I've accomplished that goal.

If you're curious, my first post was instructions for carving a pumpkin using a real photo, which I did with Jack Sparrow from Pirates of the Caribbean (as you can see in the photo above).

Friday, November 18, 2011

Arrested Development, Parks and Recreation Paper Dolls by Kyle Hilton

Photobucket
Who would win in a fight: Gob Bluth or Ron Swanson? (Ron, obviously!)
I thought I'd take a break from NaNoWriMo to let others like me, who enjoy paper dolls based on TV shows, about Kyle Hilton. Kyle has made several dozen free printable paper dolls from shows such as Arrested Development and Parks and Recreation. I also noticed that he has The Office paper dolls listed as "coming soon." He's an amazing artist so I can't wait to see them!

And, on a not unrelated note, if you haven't seen my Office paper dolls yet, here they are all in one place:


Saturday, November 05, 2011

National Novel Writing Month


Photobucket

 It's National Novel Writing Month again, which means I won't be doing much crafting (though I do have a mystery crochet project I'll share some work-in-progress photos of soon!). You can follow my progress on my other blog, CatCarlisle.com.

One of the most fun time-wasting (but also crafty!) parts of writing is coming up with titles and mock covers - you can see this year's attempt above. Based just on the title and cover, what do you think my story is about? Post your guesses in the comments. I'm curious to see what you all think!

Tuesday, November 01, 2011

Shrek Puss In Boots Costume

Photobucket

My only opportunity for dressing up this Halloween was at a friends "Trunk or Treat" event (that's where you trick or treat out of the trunk of your car). She and her husband were going as Shrek and Fiona so I decided to throw together a Puss in Boots costume. It only took me an afternoon and I think it could be easily adapted to put together a costume for a child. Here's what I did:

Hat - Purchased from a costume store. I sewed one side up and stuck in a yellow feather (you can't really see it in this picture). I also sewed on felt cat ears, though in the cartoon you don't actually see Puss' ears when he's wearing his hat.

Shirt - I got a cheap orange sweatshirt and used iron on adhesive to attach a yellow fleece patch to the chest and yellow stripes to the arms. It probably won't hold up to machine washing, but I only needed it to last for a night. The black cape was borrowed from an old costume belonging to my friend's child.

Gloves - I sewed peach "paw pads" on to some fuzzy white gloves. In the movies Puss often wears over-sized black leather gloves so those could be substituted.

Belt and Tail - The belt was my husband's, the sword was purchased from a costume store. To make the tail, I cut a long strip of the yellow fleece I used for the stripes on the shirt and used iron on adhesive to attach stripes of brown felt. I folded the fleece so the stripes were on the inside and sewed it shut, leaving one of the short ends open and rounding the other. I trimmed the edges, turned it right side out, stuffed it then sewed it to the belt.

Pants and Boots - The pants are khakis and the boots are left over from my Jack Aubrey costume.

Thursday, September 29, 2011

My Texas Saguaro: Two Years Later

(This was supposed to be posted here two days ago but somehow I managed to post it on my writing blog instead. Oops! Apparently I'm not too good at juggling two blogs.)

I went back to Texas for another visit a few weeks ago and got a chance to check up on the saguaro in my parent's backyard. My how it's grown!

Here's how tall it was in 2009:
Photobucket
Quite a few inches short of the fence line
In 2010:
Photobucket
At the fence line
In 2011:
Photobucket
Above the fence line
Looks to me like it's grown at least a foot, maybe even a foot and a half. I guess the weather in Texas is agreeing with it!

Thursday, September 08, 2011

Simplicity Reissues Titantic Dress Pattern

Photobucket

I was cruising Simplicity's costume patterns today and squealed like a little girl when I saw this pattern. Simplicity 8399, Misses Titanic Inspired Costume, was originally released after the Titanic movie came out in the late 1990s. I remember wanting to make the red dress for prom but at that point it was way beyond my skill level. The pattern went out of print so by the time I got back in to costuming, it was no longer available.

I wasn't going to let the opportunity to get this pattern pass me by again, so I bought it immediately. It would be great to make it for Halloween this year though I'm not sure I'll have the time. Even if I don't, I'll still have the pattern for when I do find the time!

According to Simplicity.com, this pattern is only available on their website, so don't go to the fabric store and expect to find it. It's being reissued for the "100th anniversary of the Titanic." So the anniversary of its sinking, I guess? A bit morbid but I'm not complaining!

Friday, September 02, 2011

New "The Office" Paper Doll: Kelly Kapoor

Photobucket
Kelly Kapoor Paper Doll PDF

The stylish Kelly Kapoor (played by Mindy Kaling) is my favorite character from the US version of The Office and I am so happy that I finally got around to making a paper doll of her. She comes wearing the pink polka dot dress from the episode "Dunder Mifflin Infinity" (Kelly to Ryan: "Well, I hope you're still committed because I'm pregnant and guess what buddy, I am keeping it!"). Her additional outfits are a blue and gray work outfit, the white dress she wore to Phyllis's wedding ("I look really good in white") and the pink salwar kameez she wore when applying for the minority executive training program in "Body Language." Her accessories are a framed photo of Ryan Bailey Howard, a stylish magazine and the customized nameplate she got from Stanley in "Christmas Party."

All you need to do to get the doll is click on the link to open the PDF, print it on heavyweight paper, cut everything out (you might want to use an X-acto knife to get the fine details) and enjoy! I've also made dolls of Michael, Dwight, Pam, Jim and Creed - you can find them here.

Tuesday, August 16, 2011

How To Make Amigurumi Hair: Wig Method

Dumbledore's fluffy hair and beard
Here's a tutorial for the method I used to make the hair for several of my Harry Potter amigurumi dolls. Be aware that it can be very time consuming - I think I spent about three hours on each wig. I have also added a tiny bit at the end about amigurumi beards as well.

Supplies needed:
  • Your hairless amigurumi
  • Yarn in the color you want for their hair (use same weight yarn as the amigurumi)
  • Crochet hook (size depends on weight of yarn)
  • Scissors
  • Felt glue (or other non-washable fabric glue)
  • Plastic yarn needle
  • Sewing pins
  • Sewing thread that matches the hair color
  • Sewing needle
Step 1 - Make a wig cap.

Crocheted wig cap
Spiral crochet a wig cap that is slightly bigger than your amigurumi's head in the color of yarn you will be using for the hair. The simplest way to do this is to recreate the top of the amigurumi's head to the point at which it stops increasing and then add one more increasing round. For example, if the amigurumi's head has this pattern:

Rnd 1: 6 sc in magic ring (6 sts).
Rnd 2: 2 sc in each st around (12 sts).
Rnd 3: [2 sc in next st, sc 1] six times (18 sts).
Rnd 4: [2 sc in next st, sc 2] six times (24 sts).
Rnd 5: [2 sc in next st, sc 3] six times (30 sts). < last increase
Rnd 6: sc around (30 sts).
Rnd 7: sc around (30 sts).
Rnd 8: [sc2tog, sc 3] six times (24 sts).
Rnd 9: [sc2tog, sc 2] six times (18 sts).
Rnd 10: [sc2tog, sc 1] six times (12 sts).
Then for the wig cap, crochet up to the last increase and add another increasing round like this:
Rnd 1: 6 sc in magic ring (6 sts).
Rnd 2: 2 sc in each st around (12 sts).
Rnd 3: [2 sc in next st, sc 1] six times (18 sts).
Rnd 4: [2 sc in next st, sc 2] six times (24 sts).
Rnd 5: [2 sc in next st, sc 3] six times (30 sts) 
Rnd 6: [2 sc in next st, sc 4] six times (36 sts). < add one more increase

Bind off and leave the tails - they can be used as part of the hair.

Step 2: Add the hair.
Adding loops of hair
Starting at the center of the cap and working outwards in a spiral, use a crochet hook to pull loops of yarn through the holes between stitches. The length of the loops depends on how long your character's hair will be, but be sure to make them a bit longer than necessary so you have some extra to trim off at the end.

Unless you want your character to have a crazy-thick head of hair, don't put a loop of yarn in every single hole. Experiment by skipping one or two holes and see how you like the thickness. As long as you haven't glued or cut the hair, you can always pull it out and start over. Make sure that your skipped holes don't clump together or you might end up with bare patches on the wig.

It's a good idea to mark the front of the wig (see the red piece of embroidery floss in the photo above). Hair at the back of someone's head is usually shorter than hair at the front, so I made my loops longer when I was close to the marker.

Adding loops in outside stitches
After you've filled all the holes, do an extra round by pulling a loop through the outside strand of each of the outer stitches (see photo above). Do not skip any stitches.

When you're done, the wig will look like this:

Outside
Inside
Step 3: Glue the hair.

Glue the hair
On the inside of the wig cap, liberally apply glue to each strand of hair. Use felt glue or some other sort of non-washable fabric glue. Be sure not to miss the outside row of hair you added on the last round. While it is important to make sure every strand is covered, don't go overboard and slather every millimeter with glue or the wig cap will lose its flexibility when the glue hardens.

Let the glue dry.

Step 4: Cut the loops.

Once the glue has dried, take a pair of scissors and cut each loop on the outside of the wig into two strands of hair. Be sure to straighten out each loop and cut it at the longest point so both strands will be the same length.

For straight hair, skip to Step 6. For curly or bushy hair, go to Step 5.

Step 5: Separate the plies and brush if desired.

This is the part that will probably take you the longest. Each strand of yarn is made of several smaller strands twisted together. These smaller strands are called plies (3-ply yarn has 3 plies, 4-ply yarn had 4 plies, etc.). Start on one side of the wig and take each strand of hair and carefully separate the plies. I did this by using a plastic yarn needle to pick the strands apart. When the plies are separated, use a spare piece of yarn to tie them to the side so they won't get tangled or mixed in with the unseparated hair.

Unbrushed hair
When you're finished you will have a wig of curly like Hermione's. If you want bushy hair instead of curly, then use a wire brush (I used a wire slicker cat brush) to gently comb the strands. I recommend taking a clump of hair and holding it by the root while you brush it so that the strands don't get pulled out. Be aware that large amounts of the hair will end up being brushed out, so only do it if your wig already has very thick hair. Hair that has been brushed out will be bushy like Hagrid's:

Hagrid's bushy hair
Step 6: Sew the wig on.

You marked the front of the wig in Step 2, right? Line up the front of the wig with the middle of the amigurumi's forehead. Make sure it looks how you'd like it to then pin it in place. Use a double strand of thread on a sewing needle and sew the wig to the head. At the end, put the needle in the middle of the wig, tie off and trim the thread (that way the end bits are hidden in the hair).

Step 7: Cut and style.

Now that the hair is on your amigurumi character, it's time to cut and style it how you wish. Brush out the hair with your fingers (a real brush will mess it up) and trim any uneven ends. Cut the hair to the length you desire then style it. Congrats, your amigurumi has hair!

Beards

To create Dumbledore's and Hagrid's beards, I used the same method as outlined above except instead of creating a wig cap in Step 1, I crocheted a flat triangle , the bottom of which would become the top of the beard. After following Steps 2-5, I sewed it underneath the amigurumi's nose (or where their nose would be if they had one) and the whole thing was trimmed in to a beard shape.

Monday, August 15, 2011

Confessions of a Cat Mommy Blogger on CatCarlisle.com

Photobucket

Last week at CatCarlisle.com I finally admitted the jealousy I feel toward mommy bloggers. If you're a crazy cat person, you may find it amusing: Confessions of a Cat Mommy Blogger.

Monday, August 01, 2011

Crystals in a Bottle

My husband and I collect minerals. One day while we were browsing in a rock shop we saw this cool old bottle full of crystals. Apparently someone had left a liquid in the bottle for too long and it evaporated, forming crystals. We though it was really neat but way too expensive so I decided to try to replicate it.

Photobucket
We found a packet of crystal growing powder (available at places like Hobby Lobby) and an inexpensive bottle from an antique store. The crystal growing powder was fairly simple to use, though it is poisonous and requires use of the stove so adult supervision is needed.
Photobucket

 We mixed up the solution, poured it in the bottle and let it sit for several days.
Photobucket

When we poured out the remaining solution, we had a nice blanket of crystals at the bottom. They were pretty small so we repeated the procedure a few times.

Photobucket

I wish the crystals were different sizes; I'd like some longer ones mixed in with the short ones. Actually, we accidentally grew some long crystals at the bottom of the pot we were using to store the extra solution. Maybe if we try again with a new bottle we can grow some long crystals in the pot first, then place them in the bottle and grow the short crystals around them.

Wednesday, July 20, 2011

Homemade Clam Chowder

Photobucket
Clam chowder in a bread bowl
We were looking for something different to cook one weekend and because we're now in a place where we can actually buy fresh seafood, we decided to try clam chowder. We used a low fat clam chowder recipe from Food Network.
Getting the clams was a bit of an adventure. Most of the big fish markets were closed because it was Sunday, but we found a tiny Asian fish market on the other side of town that had them. Of course when we got home and went to pick up a few ingredients at our local grocery, we discovered that they had clams too so we had wasted a trip.
The chowder was good but I have to say that the clams were probably more trouble than they were worth. It probably took an hour outside the rest of the soup to soak, clean, cook, clean again (once they opened) and chop them and in the end we couldn't really taste them except as a few meaty bits in the soup. The recipe we used had potato and bacon in it which made up most of the flavor. If we made it again, we'd leave out the clams and make it a potato bacon chowder. Bacon makes everything better!

Thursday, July 07, 2011

Harry Potter Amigurumi Dolls

Harry, Dumbledore, Ron, Hagrid and Hermione

I made these five Harry Potter amigurumi dolls for a friend and her kids who all love the series. I had a lot of fun making them though they took much longer than I expected. Part of that may be because I was trying to made a duplicate set of dolls for myself at the same time because I knew if I didn't make them then, I never would. Unfortunately when we decided to move I had to rush to finish them and didn't get to make Dumbledore or Hagrid for myself.

Since I don't own the rights to Harry, I can't post a pattern. However, I will explain some of the basic techniques I used to create the dolls. I ended up doing a few new things for these dolls that I had never attempted before.


The bodies: I used a basic mushroom body shape, like the body I made for my Nativity dolls. Hagrid needed to be bigger so I added stitches to make him fatter and added extra rounds to make him taller. For Dumbledore, I didn't add extra stitches but I did add extra rounds.


The hair: This was my biggest challenge as I had never done hair on an amigurumi doll and it took a lot of experimentation. I think I will do a separate post with photos of the methods I used, but for now I will summarize by saying that for Hermione, Dumbledore and Hagrid's hair as well as the two beards, I crocheted a "wig cap" then threaded yarn through the spaces between stitches. I put glue on the underside of the cap so the hair wouldn't get pulled out. I pulled apart the strands of each yarn then used a wire brush to gently brush the yarn so it got fuzzy (except for Hermione, I didn't brush her hair out). I then attached the cap to the head. For Harry and Ron, I embroidered the yarn directly on to their heads.


The robes and Hagrid's vest: I started with my pattern for Joseph's robes and just added sleeves by picking up stitches around the arm holes and then crocheting in a spiral until they were long enough. Hagrid's vest was a short version of the robe without sleeves.

Scarves: I experimented with crocheting and knitting ties and scarves out of embroidery floss but when nothing turned out how I wanted, I switched to regular yarn and a homemade four-stitch knitting Nancy to make the i-cord scarves (this could also be done by using the double pointed knitting needle method, see this video).

Details: The faces and details were embroidered with embroidery floss. The eyes were safety eyes. Dumbledore's hat was a simple cone.

Tuesday, May 17, 2011

Hiatus

Photobucket
View of the mountains near our home. I sketched it from the cemetery.
We're moving! There are about a million things I have to do so The Crafty Cattery is going on hiatus until we are settled in our new home, probably in a couple of months. See you then!

Monday, May 09, 2011

Work In Progress: Harry Potter Amigurumi Dolls


A quick peek at the Harry Potter amigurumi dolls that I am making for a friend. I've finished the "trio" of Harry, Ron and Hermione and am starting on Hagrid and Dumbledore.

Because Harry Potter is a licensed property I won't be able to post a pattern for any of the dolls, but when I am finished I will detail some of the techniques I used while making them.

Monday, April 25, 2011

Thirty-Second Needle Holder

Photobucket

I'm a bit obsessive about dropping a needle or pin in the house because I'm afraid that I'll step on it or worse, my cats will try to eat it (I've caught one of them trying to eat screws so it's a possibility!). To keep my needles safely organized and away from my cats, I've made a simple needle holder.

Photobucket
Supplies
Supplies needed:
  • tube-shaped candy or pill container
  • felt
  • marker 
  • scissors
  • needles or pins
Photobucket
Step 1
Step 1: Use the marker to mark the height of your container on the felt. I've decided to use the pill container since it has a childproof lid.

Photobucket
Step 2
Step 2: Cut out a length of felt that is the height of your container and about 4-5 inches long. Roll up the felt and see if it will fit inside the tube. If there's too much, trim it off.

Photobucket
Step 3
Step 3: Put your needles in the felt. Make sure they are all pointing the same way.

Photobucket
Step 4
Step 4: Roll up the felt and put it in the tube. Be sure the needles are always pointing towards the bottom of the tube so you don't poke yourself when you pull out the felt. 

That's it! If you like you can also decorate the tube (I used stickers). I recommend labeling it so it doesn't get thrown away by accident.

Related Posts with Thumbnails