Monday, March 28, 2011

"The Office" Paper Doll: Michael Scott with Desk and Costumes

I've made a new Office paper doll! Well, actually it's the Michael Scott doll I made a couple years ago but I've given him costumes and accessories.

Photobucket

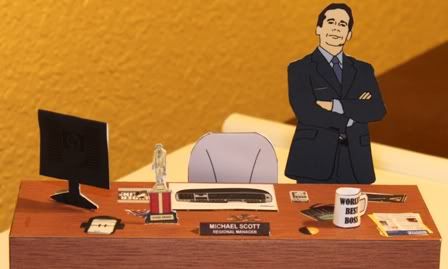
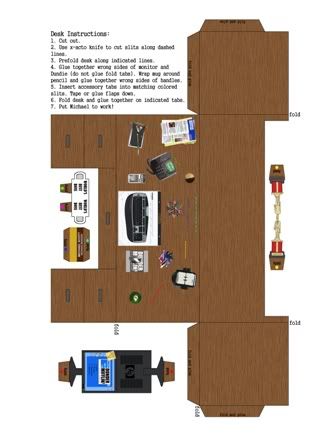
Costumes include Willy Wonka (from "Golden Ticket"), magician's straight jacket, Prison Mike doo-rag and Michael's second head Halloween costume. Michael comes with his chair and desk, complete with monitor, Dundie, nameplate and World's Best Boss mug. Click here to download the PDF (Note that the file is somewhat large so it may take a little while for it to load). Download it, print it on heavyweight paper, cut everything out and enjoy!
Photobucket Photobucket

I want to say thanks to tanster for featuring this doll on Officetally a few weeks ago. Thanks tanster!

You can find the Dwight, Pam, Jim and old Michael dolls I created a while ago here, and my Creed doll with accessories is here.

Here are some photos of the assembled doll and desk:

Photobucket
Photobucket Photobucket


Photobucket

Photobucket

Monday, March 14, 2011

Fingerless Knit Gloves

Photobucket

I spend most of my time working on the computer and this time of year that means my wrists and fingers end up painfully cold. I've tried wearing gloves but they make it hard to type. I bought fingerless bike gloves but they only covered a tiny bit of my fingers and none of my wrist.

At the store today I saw a cheap pair of knit gloves with long wrists, So I bought them and decided to cut the fingertips off. This way they would keep my hands and fingers warm but would still allow me to type easily.

Photobucket

I found a great tutorial by Annie Spandex that was pretty close to what I wanted to do, though I ended up doing a few things differently. Here's what I did:

Photobucket

1. I put on the gloves and marked with pins where I wanted to cut them.

Since knit gloves are stretchy, always cut off less than you think you should. I marked them about a quarter inch above the top joint in each finger and after I cut them and tried them on again, they ended below that joint. If I could do it over again, I'd just cut off the very tip. Remember, you can always cut off more but you can't put back what you've already cut off.

Photobucket

2. I took off the gloves (carefully so didn't get poked by the pins). Using sharp scissors, I cut off each finger tip of the glove above the pin.

Photobucket

3. I took out the pins and tried on the gloves to make sure I didn't need to cut off more.

Photobucket

4. I stuck a marker in each finger then put each glove in a glass and arranged them so the fingers weren't touching. This is so the fingers won't stick together when I put the Fray Check on them.

Photobucket

 5. I put Fray Check on each cut edge. It doesn't take a lot, but the fabric should be saturated.

Photobucket

Looking around the web, lots of people recommend different things for finishing the raw edges: fabric glue, regular glue, even Shoe Goo! I already had Fray Check so that's what I ended up using. It does end up being a little stiff when it dries but it will soften with wear.
I let the Fray Check dry then tried them on! Sophie helped me test them out:

Photobucket

Related Posts with Thumbnails