Update 4/29: I can't believe it, my entry won first place! Thanks to everyone who voted for it and thanks to Officetally for holding this awesome contest. Even more unbelievably, Andy Buckley, the actor who plays David Wallace, commented on my diorama!

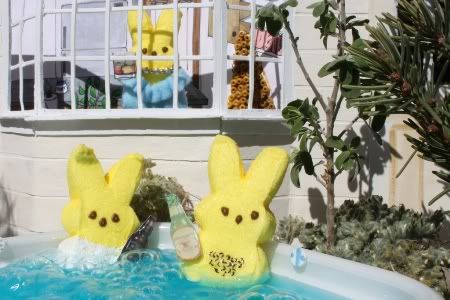
I'm a big fan of the TV show "The Office", so this year I decided to enter Officetally's The Office Peeps Contest. The goal was to recreate a scene from Season 6 (the current season) using marshmallow Peeps. Here's my entry:
And the scene from the episode "Sabre" it was based on:
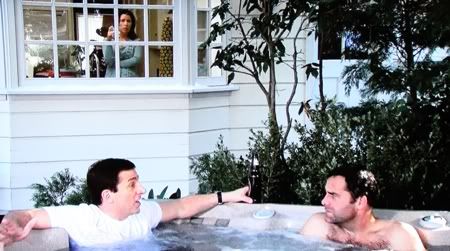
This scene was suggested by one of my friends at dundermifflininfinity.com and I thought it was a great idea. Michael goes to to the home of former Dunder Mifflin CFO David Wallace to complain about Sabre, the new company that bought them out. But Michael finds out that joblessness had hit his former boss hard when David invites him into his hot tub and gives him a pitch for his new invention "Suck It" (a vacuum for kid's toys). I think a lot of us liked this scene because we got to see David without his shirt! :D
I thought I'd quickly detail how I made the diorama. It's sort of for my benefit, so I can remember how I made everything the next time I try to make something like this.
The Hot Tub. The hot tub was a plastic food container. I spray painted the back side white and hot-glued some foam "dials" on it. To keep the Michael and David Peeps in place I hot-glued nails to the inside of the container. The water is normal water with a little bit of blue food dye. To create the bubbles I had my husband standing off-camera with a straw. The straw had one end closed and I punched holes with an ice pick in the sides so it would make a lot of small bubbles.
The David Wallace Peep. When I tried to draw David's chest hair directly on the Peep it didn't work too well. The ink wouldn't come out easily and I ended up digging holes in the marshmallow. To fix this I dabbed some clear nail polish on the area and let it dry, then drew the hairs on.
The Michael Scott Peep. I used acrylic paint to give Michael a white shirt. I was bad and didn't let it dry before taking the photos so it quickly began to wash off. Oh well!
The Beer Bottles and Whiskey Glass. I found photos of the actual beers Michael and David were drinking in the scene, resized them to Peep size then printed them out on cardstock. I cut out the bottles and went over the fronts with hot glue to make them look three-dimensional. On the back I painted some clear nail polish so the paper wouldn't dissolve when it got wet, then glued on part of a paper clip so I had a way to attach the bottles to the peeps. I did the same thing for the whiskey glass.
The Greenery. These were all parts of plants and weeds from around my house. I thought using actual plants would look a lot better than trying to make fake plants.
The House. The walls were cardboard. The windowsill was made of popsicle sticks, the muntins (crosspieces) on the windows were plastic cable ties, and the siding is strips of construction paper that have been painted over.
Mrs. Wallace Peep. Her blouse is made of felt and the necklace is an actual necklace that I wired on to her.
Kitchen Backdrop. I drew the backdrop and colored it in with markers. If you look closely in the lower left corner of the window, you'll see a jar of marshmallow fluff that David used in an earlier scene to make a fluff sandwich. There's some sort of weird sculpture of little brown things in the original scene so I recreated it using seed beads painted brown.
The photo was taken outdoors. We had to do it in a rush because once the water went in the hot tub things started falling apart. I wish that I had noticed that there was a shadow of the top of the wall on the back of the kitchen backdrop, if I had I would've easily been able to fix it. Oh well! I'm pretty happy with my Peeps and I hope you liked it too!