
Whew, the past three weeks have been crazy! The first week we spent entertaining one of our former college professors who was in town for work, the next week I flew to Texas to visit my family, and this week we've spent several days helping a college friend move into town so she could start her internship. Thankfully everything seems to have settled down now and I can get to work on my next sewing project (once I figure out what it will be...).
In the meantime, I'd like to recommend a book I stumbled across in my local supermarket. It's called Drunk, Divorced and Covered in Cat Hair: The True-Life Misadventures of a 30-Something Who Learned to Knit After He Split (see it at Amazon). The author is Laurie Perry, aka Crazy Aunt Purl. I was so surprised to see her screen name on the front of a book - I've visited her website a few times to view knitting patterns but I had no idea that she had written a book!
As you can probably tell from the title, the book isn't really about knitting. Instead knitting is a common theme throughout the chapters as Laurie discovers that learning to knit helps her recover from her divorce. Divorce self-help books aren't something I would normally find myself reading (especially considering what kind of message that might send to my husband) but her funny stories and humorous writing style really kept me entertained. She also has 14 "Knitting Recipes" at the back of the book, including the pattern for the first hat I ever knitted (her Easy Roll-Brim Hat). You can view an excerpt from Drunk, Divorced and Covered in Cat Hair at Amazon by using their Search Inside feature, so give it a look!
Thursday, January 24, 2008
"Drunk, Divorced and Covered in Cat Hair"
Thursday, January 10, 2008
Fleece Bag with Goldfish Applique


Here's my first attempt at a full-sized bag (see my Elephant Fleece Applique Pillow post for the technique I used to attach the applique). I started it months ago but my old Singer couldn't handle the multiple thicknesses of fleece and interfacing so I had to quit. I tried again when I got my new Viking and it couldn't handle it either! So I talked my dad into letting me "permanently borrow" his 1936 direct drive Singer. He had been using it to repair flags and the guy he bought it from had used it to sew leather so it seemed like it would be able to handle a few thinknesses of fleece! I finally got around to trying it out this week and I was able to finish the bag, but there were still a few extra-thick areas that I ended up having to sew by hand. Oh well, at least it's done!
Monday, January 07, 2008
Elephant Fleece Applique Pillow
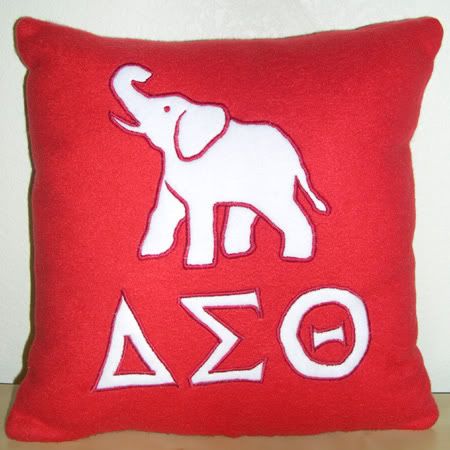
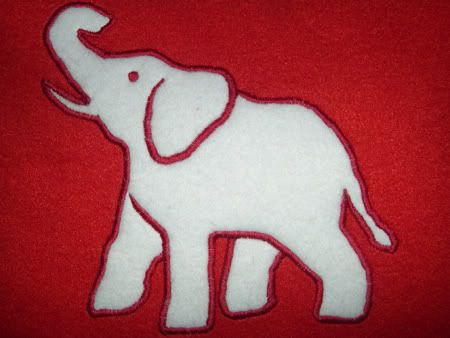
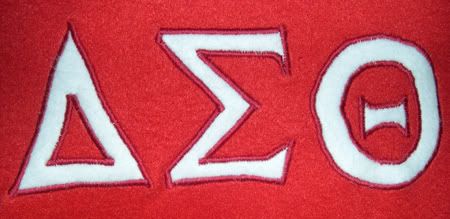
Happy New Year! Here's an applique pillow I made as a Christmas gift for a friend. She's recently joined a sorority (Delta Sigma Theta) and their unofficial symbol is an elephant. Since I'm just learning how to use my new sewing machine this project was probably a little over-ambitious (and I think it shows!). I did all right designing and cutting out the applique shapes but when it came time to sew them down with the satin stitch, things ended up getting a bit messy. Hence the wavy outlines and wobbly letters! Hopefully with more practice I'll get better at the stitching. Here's some close-ups:
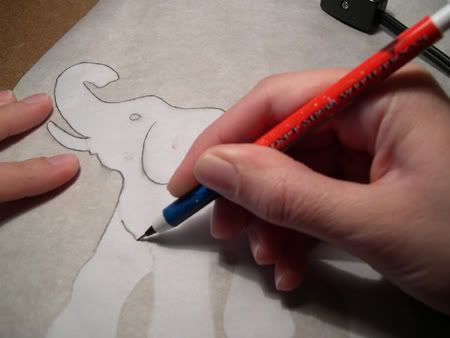
Here's how I did the applique:
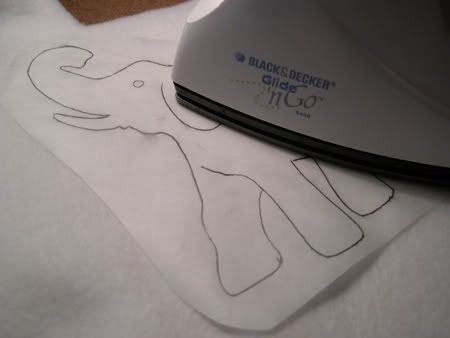
First I traced my design on to paper-backed transfer webbing. The final shape will be the opposite of what is drawn on the transfer webbing, so the image must be reversed. I forgot to do this while I was taking the photos so that elephant ended up being for practice!
Next I trimmed the transfer webbing, leaving about an inch around the design. I ironed the sticky side of the transfer webbing to the wrong side of the white fleece.
Then I trimmed the fleece to the edge of the transfer webbing. Next I put the design in my sewing machine, paper side up, and sewed along the outline of the design:
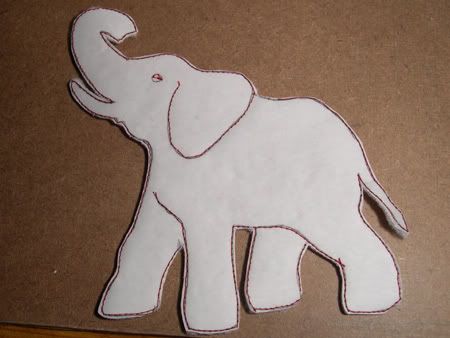
This transferred the design to the right side of the fleece:
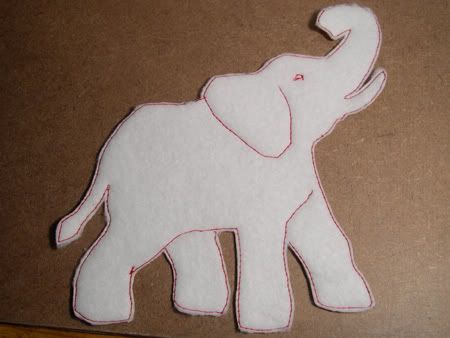
Next I removed the paper from inside the outline on the back of the applique, leaving the transfer webbing. Then I trimmed as close to the outline as possible (without cutting the thread in the outline). Note: On my first try, I trimmed close to the outline and then removed the paper. This did not work so well since the thread was less secure and tended to rip out when I pulled on the paper. So it's better to remove the paper first, then trim.
I then placed the applique piece on the background, covered it with a damp towel, and ironed it into place.
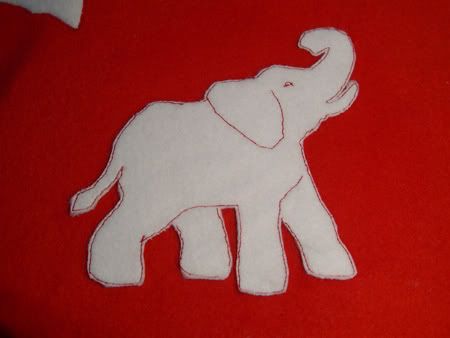
Last I went over the outline stitch with the satin stitch. It was a lot harder than I thought it would be because of all the tight turns in the elephant. I did two practice elephants before I did the final one and I still made quite a few mistakes!
Wednesday, January 02, 2008
"Eight Bells" - Montague Dawson
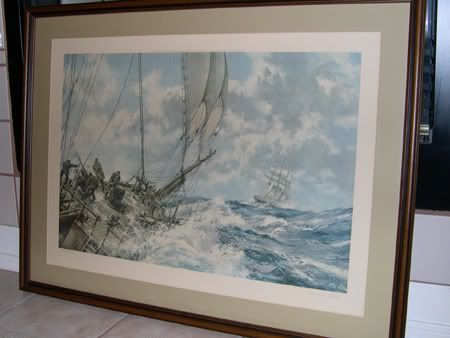
I found this great framed print over the holidays in an antique shop in Fredericksburg, Texas. It's a huge print (the frame is about 30"x40") of the painting "Eight Bells" by the nautical artist Montague Dawson. While I'm always on the lookout for prints or paintings of ships, this is the first time I found one that I liked enough to buy.
Before I purchased it, I wanted to make sure I wasn't getting ripped off by buying something that could be found online for a lot less so we ran back to the hotel and jumped on the computer to look it up. While several online shops had prints of Montague Dawson's more famous works, we found only vague mentions of this particular print in a few places (and they were mostly from people wanting to buy it!). I decided that it was worth it so we ran back to the store, bought it, and somehow managed to bring it safely back to Arizona.
Another interesting thing I found on our trip was in a book I purchased a at used book store in Llano, Texas. It's an Agatha Christie paperback printed in the 1970's. The odd thing is, there are pages of full-color ads scattered throughout the book!

I have two other Christie books from the same publisher and time period and neither of them have ads like this. However, those books originally cost $1.50 and $1.95 while the book with ads was only $0.95. I guess they were experimenting to see if people would go for cheaper books if they contained advertising. Thank goodness that didn't catch on!
Sunday, December 23, 2007
Merry Christmas!
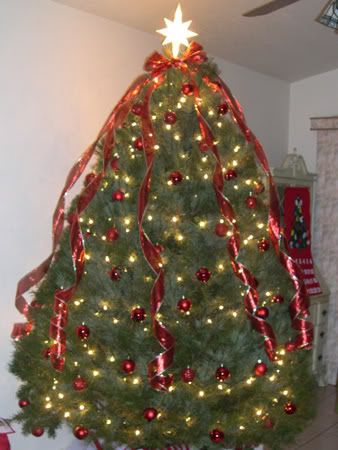
Just a quick post to wish everyone a Merry Christmas! It took 30+ shots, but we finally managed to take an acceptable photo of our first real Christmas tree. We haven't collected many interesting ornaments yet so we just bought a lot of balls (not very exciting, but they do the job!).
I've been working on my first major project with my new sewing machine and I think I've bitten off more than I can chew! I can't say more than that right now since it's a gift for a friend but, assuming I'm able to finish it (and I'm not too embarrassed by the finished product!), it will probably be my first post of the new year!
Non-crafty website of the day: The Flick Filosopher. This is the website of MaryAnn Johanson, a film critic from New York City. I'm always on the lookout for critics who share my taste in movies, and when I read her review of Master and Commander I knew she had excellent judgement! We only seem to differ when it comes to Judd Apatow films - she hates them, I like them.
Thursday, December 13, 2007
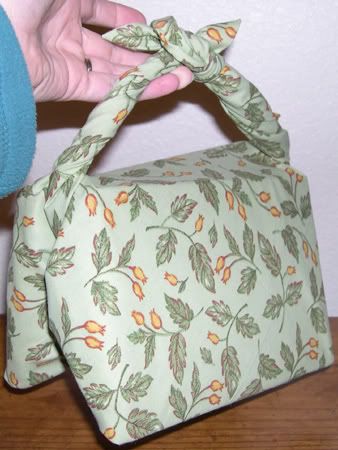
Furoshiki - Japanese Cloth Gift Wrap
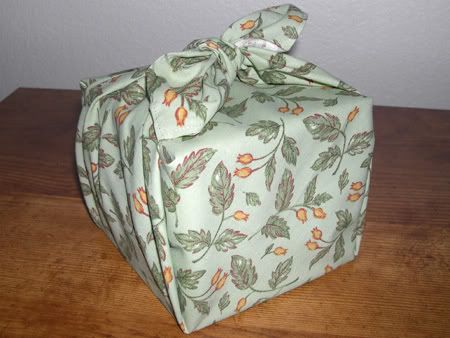
Prompted by an article in Shojo Beat magazine, I decided to use furoshiki to wrap gifts to my family this Christmas. Furoshiki, originally from Japan, are reusable cloth squares of various sizes that are used to wrap objects.
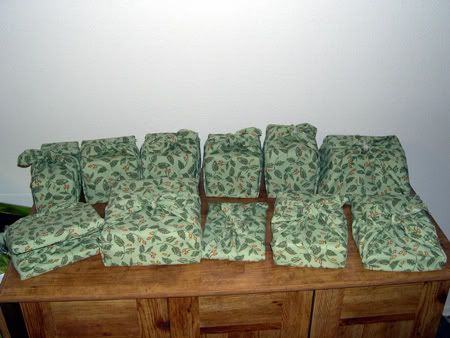
To make my furoshiki I used an inexpensive cotton fabric in a pattern that was not too Christmas-y, so they could be used again for other holidays or birthdays. I started out sewing them using instructions from a blog called Mommy Cooks. But hemming so many squares was taking forever (fold, press, fold, press, unfold, clip, fold, press, sew!) so I switched to sewing a straight stitch near the edge of the square and clipping close to it. Not as neat, but much faster!
I have also discovered that bandanas/handkerchiefs make good furoshiki for smaller items, though they can be a bit more expensive than making your own. You can find them at craft stores or even Wal-mart, which usually puts out Christmas-themed bandanas before the holidays in the purse section. At Wal-mart they're normally $1.00, but because they're not kept with the rest of the Christmas items in the store they often go unnoticed and there are usually a lot left by the time they have their 75% off after Christmas sales. I can pick up whatever they have left for $0.25 each.
To fold and tie the furoshiki, I followed an instructional sheet (in English) from the Japanese Ministry of the Environment. I then made an easier-to-print version of the instructional sheet (the original is white text on a green background) and included a copy when I mailed my gifts, so the recipients would be able to reuse the furoshiki.
As you can see from the instructional sheet I used the Otsukai Tsutsumi (basic carry wrap) for most of the gifts, but I was able to do the cool-looking Hon Tsutsumi (two books carry wrap) for one gift!
Monday, December 10, 2007
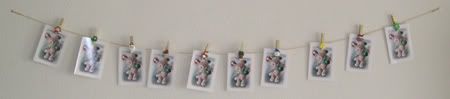
Quick Hanging Christmas Card Holder
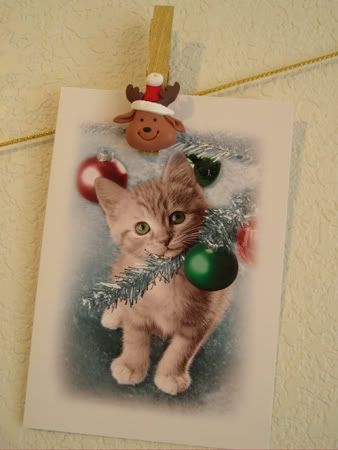
I made this hanging Christmas card holder Friday afternoon - mostly on my back patio, as you can tell from some of the photos in the instructions!
Project Name: Quick Hanging Christmas Card Holder
Time Taken to Finish: 1 hour
Materials Used: 10 clothespins, 6-7 feet of decorative gold cord, gold spray paint, 10 miniature ornaments
Special Tools Used: hot glue gun
What I Liked About the Project: Super fast!
What I Didn't Like About the Project: If I did it again I might use red or green spray paint (or both!). The gold doesn't stand out as much as I would've liked - it almost looks like I didn't paint them at all.
Instructions:
1. Spray paint the clothespins.
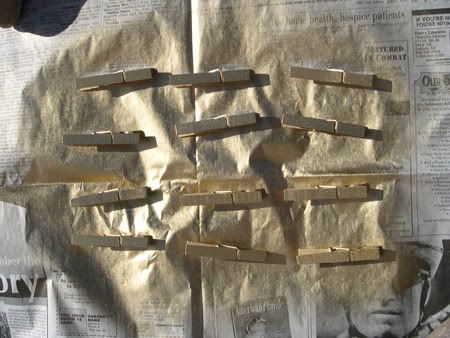
I wanted 10 pins for my card holder, so I sprayed 12 pins (in case I messed up). Feel free to make more if you want a longer card holder. Be sure to paint all sides of the pins and let them dry thoroughly.
2. Use the hot glue gun to attach the miniature ornaments to the clothespins.
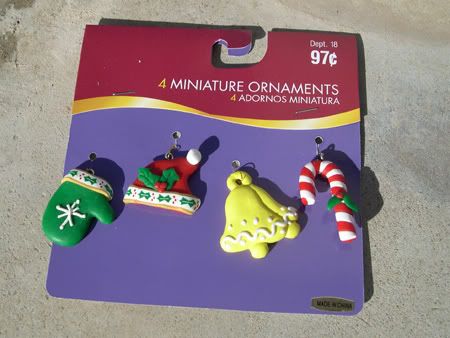
The ornaments I used
They look like they're made of Sculpey. If you can't find miniature ornaments you could also use fake holly or other small Christmas decorations. After removing the hangers from the ornaments, run a bead of hot glue down the back of the ornament and then place it on the clothespin (the mouth of the pin should be facing down). Once it is in place, press the ornament to the clothespin firmly and hold until it has cooled.
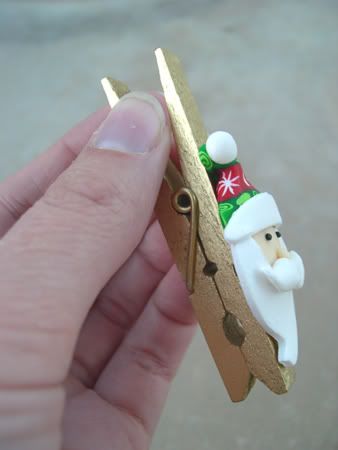
Ornament glued to the clothespin
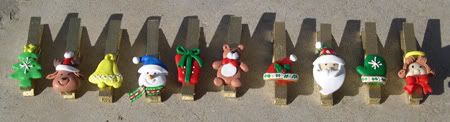
All the completed clothespins
3. Tie the clothespins to the cord, about 6-7 inches apart. You don't have to tie them on, but if you're using a thin cord like I did they may slide around. If you do tie them on, make sure that the decorated sides of the clothespins are all facing the same way.
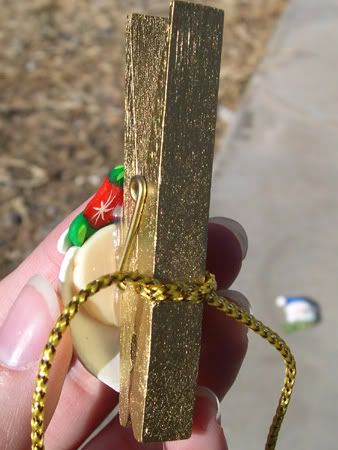
Clothespin tied to cord
4. Finally, tie a loop at each end of the cord and use thumb tacks or nails to hang your Christmas card holder from the wall!
Thursday, December 06, 2007
Peppermint Felt Christmas Tree Skirt

Here's a very basic Christmas tree skirt I finished today, along with my poor lumpy fiber optic tree. I was going for a peppermint-stripe effect!
Project Name: Peppermint Christmas Tree Skirt
Time Taken to Finish: 3 days
Materials Used: at least 2 yards of white felt, less than 1 yard of red felt, white thread, read thread
Special Tools Used: sewing machine
What I Liked About the Project: The sewing went really fast with my new machine.
What I Didn't Like About the Project: Arranging the stripes on the skirt - it took forever to get them spaced correctly.
Instructions:
1. Cut a large circle out of the white felt (as big as possible). To do this, I followed steps 1 and 2 of these tree skirt instructions on Howstuffworks.com. I would recommend practicing the circle-cutting technique on some paper or scrap material first, until you are sure you can do it correctly. The first few times I tried it on a piece of paper I messed up badly. Once I ended up with two half circles and another time I ended up with two identical smaller circles! Once you have cut out the large circle, keep it folded for the next step.
2. With the large circle still folded, use the same technique from the step above to mark and cut out a circle with 3.5 inch radius in the center of the large circle. This will be where the trunk of the tree goes.
3. Use a ruler to mark a straight line connecting the outer edge of the skirt to the hole in the middle. Cut along this line to make a slit so the skirt can be opened up. Now you have a basic solid-color tree skirt (note that none of my diagrams are to scale):
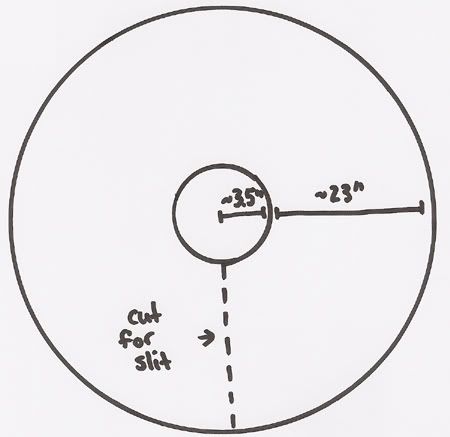
4. Cut out inch-wide stripes from the red felt. They need to be long enough to go from the outer edge to the hole in the middle, with a couple of extra inches so you have some room to work with. In my skirt this distance was about 23 inches so I made my stripes about 26 inches long. Since the yardstick I have is about an inch wide, I just lined up one side of it with an edge of the felt and then cut down the other side. Cut out as many stripes as you'd like - I made 15.
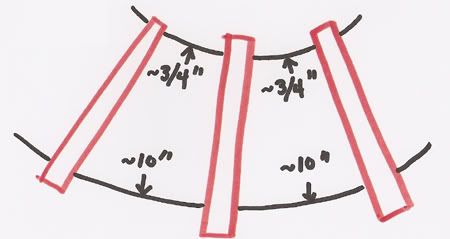
5. Pin the stripes on the skirt. For me this was the hardest part! It took a long time to space them evenly. They are spaced about .75 inches (3/4 of an inch) apart at the top and about 10 inches apart at the bottom. Pin the stripe to the skirt, making sure that you have an inch or so of stripe overhanging the skirt at both the top and bottom.
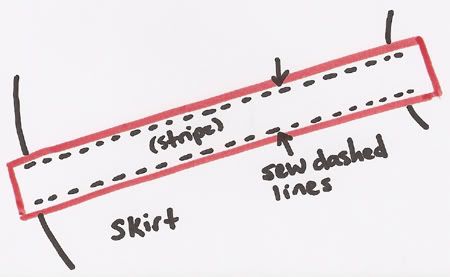
6. Sew down the sides of each stripe, but do not sew across the top and bottom yet. I used white thread to sew a zig-zag on each side of the stripe. Trim your threads (but not the excess red felt yet!).
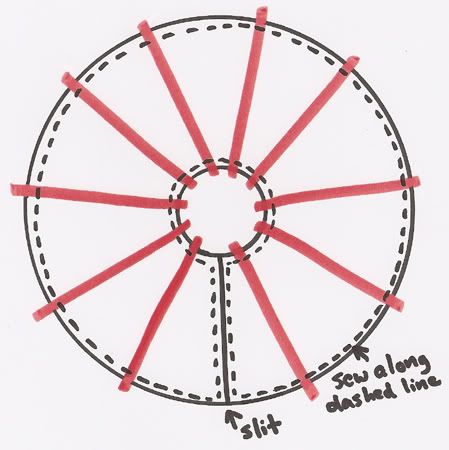
7. After all the stripes are sewn down, use red thread to sew around the entire inner and outer edges of the skirt (see diagram). Again, I did a zig-zag stitch. This will give the skirt a decorative edge as well as sewing down the tops and bottoms of the stripes. Trim your threads, then trim the excess red felt so that the edges are even with the edges of the skirt. You're done!
Tuesday, December 04, 2007
My new sewing machine!
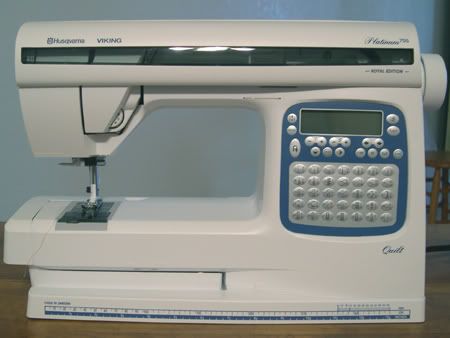
My new sewing machine is a Viking Platinum 755 Quilt. I bought it at a store called Sew What's New in Las Cruces, New Mexico (they also have a store in El Paso). Even though it was heavily discounted (because most of the Platinum line is being replaced with the Sapphire line), it still cost twice as much as we were planning to spend! Hopefully it will end up being worth it.
Before I actually visited any shops my two top choices for manufacturers were Viking and Bernina. But after seeing dealers for both, I found that the Bernina machines were more expensive and had fewer of the features that I wanted. At the Viking store I was torn between the Emerald 183 and the Platinum 755 Quilt. They had almost identical features and the prices were pretty close (the Emerald was a bit cheaper). I eventually decided on the Platinum 755, mainly because it was manufactured in Sweden and has a 20 year warranty (the Emerald 183 was made in Taiwan and had a 10 year warranty).
Roni Hardin, one of the owners of Sew What's New, must have spent over 3 hours helping me pick this machine and then showing me how to use it. I even came to her with a page of questions I thought of while researching on the internet and she very patiently answered every one. If you're looking for a sewing machine in the Las Cruces/El Paso area I would definitely recommend visiting her store!
Now that I have my new machine, I can finally finish the Christmas tree skirt I started last week. I'll do a post about it as soon as it's done.
Crafty blog of the day: Property of Kelly. Written by a graphic designer, it features her adorable illustrations as well as the occasional craft or cooking project.
Tuesday, November 20, 2007
Cool Sewing and Crafting Cart
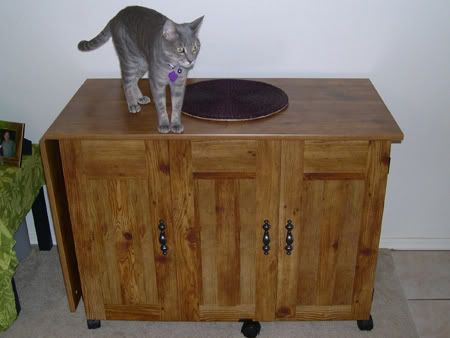
I just bought a really neat sewing/crafting cart at Walmart! It goes from this:
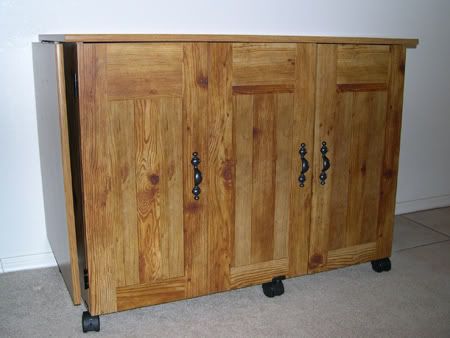
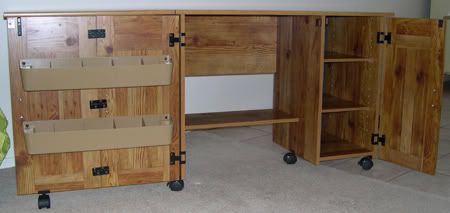
To this:
We saw it advertised in Walmart's Black Friday circular where it was priced at $75. It was listed as "Sewing Craft Table." I really wanted it but I couldn't get excited about having to fight people on Friday morning to get it. However, I went to Walmart this morning and they already had it at that price! If you're interested, I found it in the fabric department on a shelf below the sewing machines. It's manufactured by Sauder and the product number on the box is 9707-150. Walmart also has it listed online where it's currently selling for $97.42.
It took me about 2 hours to assemble by myself. Compared to other self-assembly furniture instructions I've tried to follow, these directions were detailed and well written. Also, all of the pieces of wood had identifying numbers stamped or stickered onto them so I didn't have to guess which piece was which.
Here's the cart with all my supplies in it:
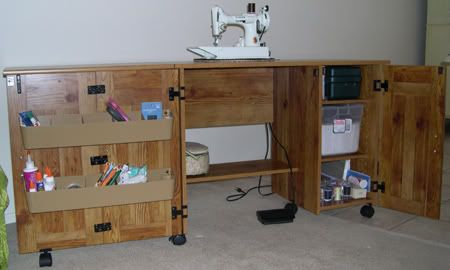
You can even store your sewing machine on the little shelf in the middle when you're not using it:
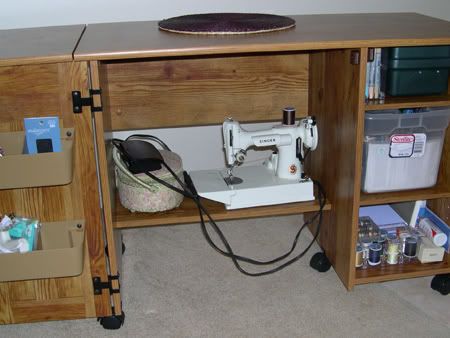
That's the only thing I find awkward about it - it's difficult to put my machine down there, and it's a featherweight. Someone with a heavier machine might have trouble getting it down there without dropping it.
I'm so glad I found this - I no longer have to do all my sewing on our living room floor! Now I can wheel the cart out when I need it and push it back against the wall when I'm done.
Here's Lucy checking out the cart:
Subscribe to:
Posts (Atom)


