Here's the felt doll I made of Kenny McCormick from South Park. I got tired of waiting for the family photography expert to take some photos, so we'll have to make due with ones I took.
Mysterion
I'm sure most people know Kenny as the guy in the orange parka, but he also has a secret super hero identity - Mysterion. His super power? He can't die.
Kenny's superhero identity, Mysterion
Up until a few years ago I would've said Kyle was my favorite kid from South Park, but after the introduction of Mysterion I've switched my favoritism to Kenny. Mysterion is just too awesome!
Kenny without his hood
Since I was making Kenny's outfit changeable, I wanted to show his face too. Because I had to fit his hair in under his hoods, I couldn't give him as much as he has in the show.
Kenny's base body
This is what the doll looks like without the removable pieces. When his orange parka is on only the orange pants are visible and when he's wearing his Mysterion boots the orange pants are covered up. I'm not super happy with the way his chin puckers, but it was the best I could do.
The removable pieces
Below are my drawings that I used as a pattern to make the doll. See my IT Crowd Dolls for more information on how I make these dolls.
I don't usually do updates but there are a few little things I feel like I should mention so... I'm going to mention them!
House-Buying Update: We are still buying a house but its going to take longer than we thought. Expect not to hear anything from me for a couple months this fall while we move.
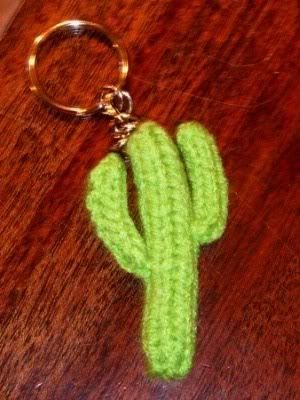
My Texas Saguaro: I visited my parents last month and took another photo of the saguaro cactus in their yard (above). It's still growing like crazy (previous pictures are here).
Pixel Art Blanket: I've got two or three more rows finished on the Mario blanket, but not enough to bother posting a photo. I have made a video that shows the method I'm using to attach the granny squares to the blanket as they are made (instead of sewing them together afterward) but I don't know if I should post it now or wait until the whole thing is finished.
South Park Felt Doll: I've made a felt doll of Kenny from South Park, like the IT Crowd dolls I made a few months ago. Kenny's hood comes off so his face can be seen and there is an alternate Mysterion costume (Mysterion is Kenny's superhero alter-ego). I need to get my husband to take some good photos of him and then I can do a post.
Special Project That May or May Not Happen: I've been asked to do a project that has me incredibly excited, but at this moment I'm not sure if it's actually going to happen. I would feel silly if I posted about it and then nothing ever happened, so I'm going to force myself to wait until I know for sure. So if it does happen, you'll hear about it ASAP. But if I never mention it again, you can assume it fell through. Fingers crossed that it doesn't!
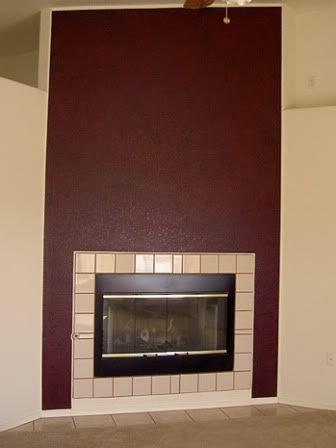
My fingers are crossed that by the time this posts, our house in Arizona will be one hundred percent no longer ours. It was a nice little house and we were finally getting it the way we liked it (see above) when the move happened. I hope the buyers will enjoy it as much as we did, and that they don't hate my choices in paint colors!
Now that it has sold, that means it's time for us to find a place to live in Salt Lake City (and get out of this %$#@ apartment!). The amount of options here compared to where we lived in Arizona is frankly overwhelming. There are 15 towns/suburbs that are in a comfortable commuting distance from my husband's office and according to Zillow, there are about 1500 houses in those areas in our price range. It's hard to even know where to start!
All these big decisions we have to make and another move that has to happen means that over the next few months I will have absolutely no time or brain power left to devote to blogging. Instead of feeling bad about my blogs languishing alone and unloved, I'm going to put them on hiatus for a few months until things get back to somewhat normal. But if you need anything, feel free to leave a comment or contact me - I'll still be around.
Let's play a game - it's called, "What in the Heck is Cat Making Now?" Look at the photo above and see if you can figure out what I'm making. Yes, those are granny squares but it's not your typical granny square blanket. So what is it? The only hint I'll give is that I've completed six out of twenty-seven rows, and the bottom row in the picture will be the bottom row in the blanket.
Leave your guesses in the comments and if I've already told you what it is, please keep it to yourself. If no one gets it, I'll continue to post more photos of my progress until someone figures it out.
Back in January I made a felt doll of Moss from the British sitcom The IT Crowd and now I've made his office mates Jen and Roy. The dolls are "cute" versions of the characters (the geek part of me wants to use the anime terms "chibi" or "super deformed"). I got my husband to use his fancy camera to take a bunch of glamor shots of them for me. Scroll down past the photos for construction information.
Maurice Moss. It's hard to see, but he even has wrinkly socks made out of panty hose.
Moss
Jen Barber, with the too-small red shoes she squeezed her feet in to in "Calamity Jen."
Jen
Roy Trenneman, who always needs a shave.
Roy
I used a very simple method to make these dolls.
How I made the pattern:
I started with a blank doll body and sketched the clothes, hair and face on to it by hand.
I scanned the drawing in to the computer, cleaned it up and colored it, then used the color drawing as my pattern.
I had to do a little bit of adjusting to make the clothes fit over the stuffed body (usually just scaling them up a few percentage points on the computer) and the shoes required their own patterns, which I have included below.
How I sewed the doll:
I used a whip stitch for all of the stitches.
The fabric was sheets of synthetic felt, available for around thirty cents a sheet from most craft stores.
Roy's stubble and the stripes on Moss' shirt were drawn with colored permanent markers.
Using the blank doll pattern, I cut out the body from two pieces of felt. I embroidered the face on, attached the eyes then sewed the two pieces together around the edges, leaving the top of the head unsewed. I stuffed the body.
I cut out the hair and sewed it to the head, stuffed the head, then sewed everything closed.
I cut out the clothes from felt, added any details and sewed them on over the body. They're not removable.
I made the shoes using the patterns below. Originally I tried to make the shoes flat like the rest of the clothes, but they didn't look right. After a lot of experimenting I came up with the sneakers and high heels patterns below.
Here are the drawings I used as patterns, the blank body patterns and the shoe patterns.
Moss drawing
Jen drawing
Roy drawing
Blank body - male
Blank body - female
Sneaker pattern (sew together the two sides marked "sew" then sew the sole to the shoe)
High-heeled shoe pattern (sew the toe and the back together, sew the sole to the bottom of the shoe then sew the top of the heel to the bottom of the sole)
I hope to make dolls of two more characters, Douglas and Richmond, at some point, but it is very likely we'll be moving in the next few months so we'll see how soon I get around to it.
My patterns are free and may not be sold. Please
do not reproduce or repost patterns or instructions from
CraftyCattery.com without my permission. For information on selling
items created from my patterns, please view the FAQ.
Most of this pattern is continuous crochet and there are a few color changes. The wings are crocheted flat.
I like to make all the accessories first so they are ready to be sewed on when I make the body. That's why they're listed first in the pattern.
The finished size of the figure is 5 inches.
Materials needed:
Bulky weight yarn in a flesh color, white (for body and wings) and brown (for hair). I used Lion Brand Jiffy. Optional: you can also a fluffy or feathery white yarn for the wings.
Optional: gold embroidery floss (for decoration on sleeves)
Wired gold cord or floral wire and unwired gold cord (for the halo)
Thread that matches the hair color
Size H (5.00 mm) crochet hook
Yarn needle
Stuffing
Optional: Bean bag plastic pellets. Putting some of these in the bottom of the Joseph figure can help it balance better. Make sure the pellets are large enough that they won't work their way through the crochet stitches. Pellets are not recommended if small children may have access to the figure.
Abbreviations used in this pattern:
Rnd = round, when doing continuous crochet
Row = row, when doing flat crochet
sc = single crochet
st = stitch
sts = stitches
ch = chain
slp st = slip stitch
sc2tog = single crochet two stitches together, aka a decrease. (I recommend using falwyn's invisible decrease.) sc3tog = single crochet three stitches together.
The pattern:
Angel's Hair
Use spiral crochet with the brown (hair color) yarn to make the wig cap:
Rnd 1: 6 sc in magic ring (6 sts).
Rnd 2: 2 sc in each st around (12 sts).
Rnd 3: [2 sc in next st, sc 1] six times (18 sts).
Rnd 4: [2 sc in next st, sc 2] six times (24 sts).
Rnd 5: [2 sc in next st, sc 3] six times (30 sts).
Go to my amigurumi wig instruction page and follow Steps 2-5 to add hair to the wig cap.
Angel's Wings
Make two. Crocheted flat using white yarn (the same yarn as the body or the optional fluffy/feathery yarn). Leave a long tail at the start to use to sew the wing to the body.
Row 1: ch 9. sc in second chain from hook. sc in each chain 7 more times (for a total of 8 sts).
Row 2: ch 2. sc in second chain from hook. sc 7 (for a total of 8 sts). ch 1 and turn.
Row 3: sc 5. slp st 1 and turn.
Row 4: *sc 4. ch 1 and turn.
Row 5: sc 4. slp st 1 in earlier row and turn.
Row 6: *sc 3. ch 1 and turn.
Row 7: sc 3. slp st 1 in earlier row. Bind off, leaving long tail to sew to body.
* When doing a single crochet after a slip stitch, do not do the single crochet in the slip stitch. Instead, skip over the slip stitch and do it in the next single crochet (see video).
Angel's Arm
Make two using spiral crochet. Begin with flesh color:
Rnd 1: 4 sc in magic ring (4 sts).
Rnd 2: [2 sc in next st, sc 1] two times (6 sts).
Rnd 3: sc around (6 sts).
Color change to white:
Rnd 4: sc around (6 sts).
Rnd 5: [2 sc in next st, sc 1] three times (9 sts).
Rnd 6: sc around (9 sts).
Rnd 7: sc around (9 sts).
Rnd 8: sc around (9 sts).
Rnd 9: sc around (9 sts).
Rnd 10: sc around (9 sts).
Bind off, leaving tail to use to sew arm to body. If desired, used gold embroidery floss to decorate the sleeves. Stuff arm.
Angel's Head and Body
Using spiral crochet. Beginning with flesh color:
Rnd 1: 6 sc in magic ring (6 sts).
Rnd 2: 2 sc in each st around (12 sts).
Rnd 3: [2 sc in next st, sc 1] six times (18 sts).
Rnd 4: [2 sc in next st, sc 2] six times (24 sts).
Rnd 5: [2 sc in next st, sc 3] six times (30 sts).
Rnd 6: sc around (30 sts).
Rnd 7: sc around (30 sts).
Rnd 8: [sc2tog, sc 3] six times (24 sts).
Rnd 9: [sc2tog, sc 2] six times (18 sts).
Rnd 10: [sc2tog, sc 1] six times (12 sts).
Color change to white:
Rnd 11: sc around (12 sts).
Rnd 12: [2 sc in next st, sc 3] three times (15 sts).
Rnd 13: [2 sc in next st, sc 4] three times (18 sts).
Rnd 14: [2 sc in next st, sc 5] three times (21 sts).
Rnd 15: [2 sc in next st, sc 6] three times (24 sts).
Rnd 16: [2 sc in next st, sc 7] three times (27 sts).
Rnd 17: [2 sc in next st, sc 8] three times (30 sts).
Rnd 18: [2 sc in next st, sc 9] three times (33 sts).
Rnd 19: sc around (33 sts).
Rnd 20: [2 sc in next st, sc 10] three times (36 sts).
Rnd 21: sc around (36 sts).
Rnd 22: sc around (36 sts).
Stuff the head. Sew the wig to the head (see Step 6 here). Sew arms to body underneath head. Sew wings behind arms. Stuff the upper part of body (stuffing it partially now is easier than trying to stuff the whole thing as you are closing it up).
Rnd 23: [sc2tog, sc 4] six times (30 sts).
Rnd 24: [sc2tog, sc 3] six times (24 sts).
Rnd 25: [sc2tog, sc 2] six times (18 sts).
Rnd 26: [sc2tog, sc 1] six times (12 sts).
Stuff the rest of the body. Add plastic bean bag pellets if desired.
Rnd 27: [sc2tog] six times (6 sts).
Bind off, closing hole and weaving in tail.
Halo
Step 1 if you do not have wired gold cord: cut a 9 inch length of regular gold cord and a 11 inch length of floral wire. Run the floral wire through the middle of the gold cord until one inch of the wire is exposed on either end of the cord. Go to Step 2.
Step 1 if you do have wired gold cord: Cut an 11 inch length. Remove an inch of the cord from each end, leaving the wire exposed.
Step 2: If needed, use glue or Fray Check to keep the raw ends of the cord from unraveling.
Step 3: Holding the ends together, twist about two inches away from the ends to create a circle. Twist all the way down to the wire ends.
Final Construction
Trim and style hair. Place halo on head by sticking the bare ends of the wire into the head. If desired, sew the angel's hands together in prayer. Pair with Joseph, Mary and baby Jesus and enjoy your nativity!
I have to admit that I didn't like the British sitcom, The IT Crowd, the first time I watched it. Actually, I didn't like it the second time either. It took three tries for me to get in to it, but once I did I was in love.
Moss, a geek who still lives with his mom, is my favorite character from the show. He's naive, sweet and not at all embarrassed by his geekiness. This is one of my favorite scenes from the show:
To make the doll, I drew a picture of what I wanted (below) and then just winged it. There wasn't really a pattern beyond that. If I could do it again, I'd make his pants a bit higher-waisted but other than that I am very happy with it.
The only real change I made from the pattern was his shoes - I tried to follow the pattern in the photo above but it just didn't look right. Here's what I came up with instead:
To make the shoe I sewed the two edges marked "sew" together, turned it inside out and then sewed the sole to the bottom.
If you'd like to make your own doll, here's a blank body you can use as a starting point:
I'd like to make dolls of Roy, Jen and Douglas from the show too. We'll have to see if I get around to it.
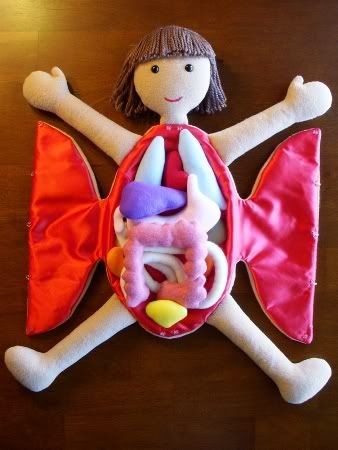
I've put together a free pattern for the anatomy doll I made a few years ago. You can find the link to the PDF at the top of the original Anatomy Doll post.
I thought I'd do a quick post reviewing the Christmas craft instructions and patterns from The Crafty Cattery. If you're looking for gifts to make for yourself or someone else, consider these!
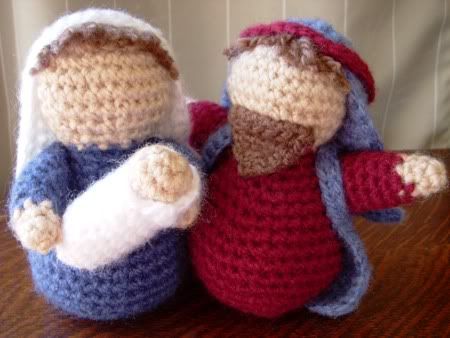
Amigurumi Nativity Crochet Pattern. So far it's just Mary and baby Jesus and Joseph but I plan to release a new pattern each year for another figure in the Nativity.
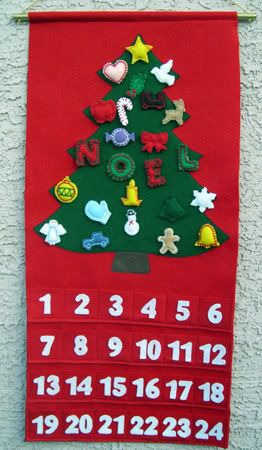
Felt Advent Calendar.Includes instructions for making the calendar and ornaments. No patterns for the ornaments, unfortunately. You're on your own with those!
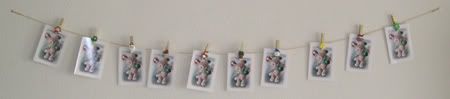
Christmas Card Holder.Instructions for making a very simple string and clothespin card holder.
I never thought I would be a homemaker, but for the moment I have to admit to being one. At least it sounds better than "unemployed"! I enjoy writing and doing crafty projects, though I can't seem to stand doing the same thing for too long. Consequently I'm doing something new every week. And of course I adore cats, especially my darling terrors Lucy and Sophie.