Tuesday, April 13, 2010

Crocheted Amigurumi German Shepherd


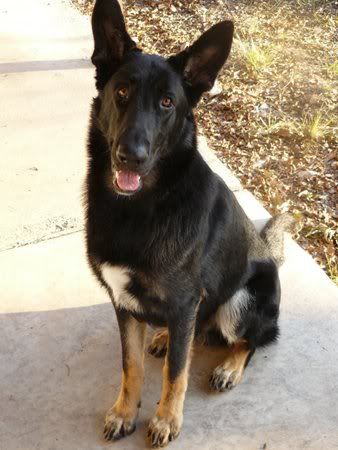
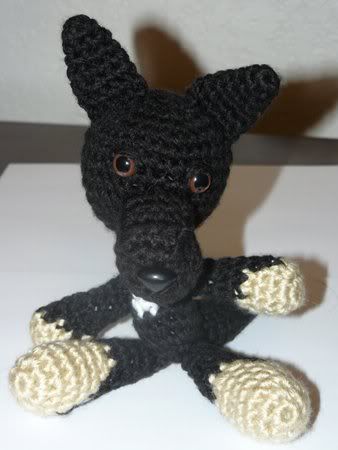
I made this amigurumi for my brother who wanted one that looked like his black and tan German Shepherd:


I used my Amigurumi Wolf pattern to create this doll and only had to make a few color changes to the paws and chest to make it look like my brother's dog. :)

Thursday, March 18, 2010

Raised Vegetable Garden


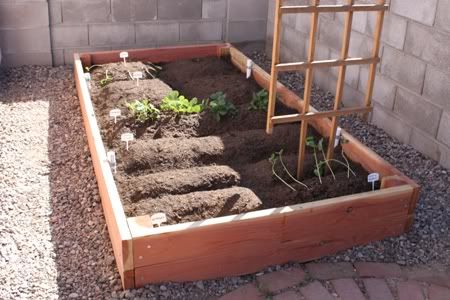
This year I've decided to attempt a vegetable garden for the first time. We have a gopher problem so an in-ground garden was out of the question - I'm not going to spend months babying my veggies only to have a gopher get to them first!

I built this 95% by myself (my husband had to help with some of the heavy lifting) so I'm pretty proud of it. The frame is redwood. You can't see it, but before filling it with dirt we stapled hardware cloth (like chicken wire but with smaller holes) to the bottom so the gophers couldn't get in.

The instructions I used were from Sunset.com. They were perfect because the size, 4 feet by 8 feet, meant it fit very nicely in the space I had. The only problem I had with the instructions were that they told me to buy 1 inch galvanized tube straps to attach the 1 inch PVC to the sides of the bed. However, I discovered that when I tried to use the 1 inch tube straps they were not big enough to go around the PVC and reach the sides of the bed, so I had to go back and use 1-1/4 inch tube straps instead.

I'm spouting seeds inside and then transferring them outside. So far I've planted squash, green beans, and strawberries (those were bought already grown). I'll probably post some updates as things (hopefully) grow.

Tuesday, March 09, 2010

Crock Pot Carne Guisada Recipe

Carne guisada is one of my favorite Tex-Mex dishes. It's basically beef in a gravy and is usually served with flour tortillas. Now that I live in Arizona I can't find carne guisada in restaurants so I have to make it myself. I tried to use a pre-made spice mix but it always ended up too salty, so I've come up with my own recipe. As it is, it's pretty mild so if you like things a little spicier feel free to substitute hotter chiles or add more chili powder.

Crock Pot Carne Guisada

Ingredients:

- 1 pound stew beef (chuck or round steak cut in to cubes)
- 1/2 onion, chopped
- 1 green chile deseeded, deveined, and chopped or 1 can green chiles, drained
- 4 cloves garlic, chopped
- 1/4 cup flour
- 1 tsp cumin
- 1 tsp chili powder
- 1 tsp salt
- water

Dump beef and veggies into the crock pot. Mix spices and flour in 1 cup of water until mostly dissolved, then pour the mixture into the crock pot. Add more water until the meat is nearly covered. Put the lid on the crock pot and turn it on. Cook on high for 6 hours or low for 8 to 10 hours. Gravy will thicken as it cools, but if it is too thin you can a little more flour.

Serve with flour tortillas.

Tuesday, February 16, 2010

Single Crochet Kimono Style Baby Sweater


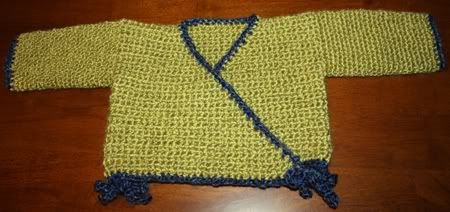
A friend requested a baby sweater for her little boy who will be showing up in March. I decided on a kimono-style sweater since it doesn't have buttons. It was crocheted with Lion Brand Homespun Yarn in Apple Green with a little bit of Colonial (blue) as edging.


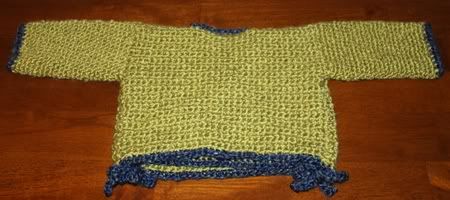
It was very simple and easy to crochet. The back panel and two front panels are crocheted flat in single crochet and the sleeves were crocheted in a spiral (I couldn't figure out how to crochet "in the round" correctly but I think that spiral crochet works just fine).

I don't have a pattern for it, but it's so simple that I don't think it really needs one. I bought a cheap long-sleeved baby t-shirt in the size I wanted the sweater to be (1Y, one year), measured it, then used those measurements to make the sweater.


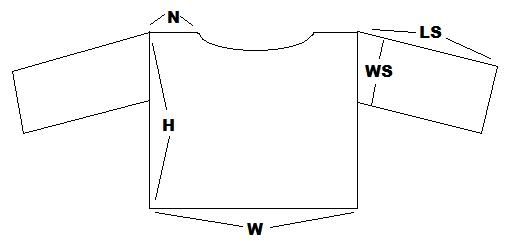
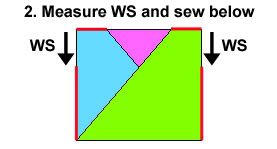
The measurements I took from the comparison shirt were the height of the shirt (H), the width of the shirt (W), the width of the sleeves at the shoulder (WS), the length of the sleeves (LS), and the distance from the shoulder seam to the edge of the neck (N).

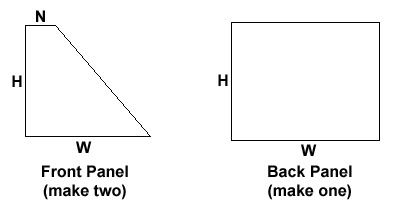
The body of the sweater consisted of three pieces: two trapezoidal front panels and one rectangular back panel.


The back panel was the simplest. I used single crochet to make a large rectangle that matched the measurements of the comparison shirt. I figured out my stitch gauge and then crocheted enough stitches in a row to equal W. I then crocheted enough rows to make the height of the rectangle equal to H.

I started crocheting the front panels at the shortest edge, N. I increased gradually every few rows, always on the same edge so that one side would slope and the other side would remain straight. I continued increasing until the width of the front panel was equal to W and the height was equal to H.

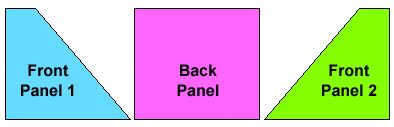
This is what I ended up with:


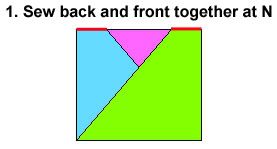
Next I placed both front panels in position on top of the back panel with their right sides together and sewed the fronts to the back along the shoulder seams (N):


On each side of the sweater, I started at the shoulder seam and measured down the amount given by WS to determine how much space was needed for the sleeves. I marked that with a stitch marker and then sewed from there down to close up the side seam.


This left me with what was basically a vest. To add sleeves to it, I crocheted around the edge of the armhole and then just kept going in a spiral until my sleeve was as long as the comparison sleeve (LS).

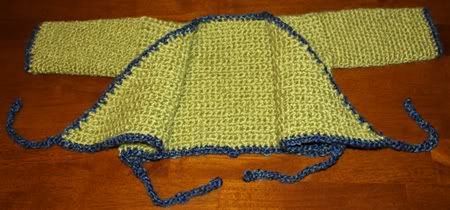
After finishing the ends, I turned the sweater right side out. Using a contrasting color of yarn, I added a row of single crochet to the ends of the sleeves. I did single crochet around the edge of the body of the sweater as well, and while doing that edging I made the four ties that keep the kimono shut. Whenever I reached one of the shoulder seams or the bottom corners of the front panels, I made a chain of about 20 stitches, slip-stitched back down the chain and then continued on the with the edging:


That's it! Hopefully it will actually fit the baby, I won't get to find out until next winter when he will be old enough to wear it.

Wednesday, January 06, 2010

Amigurumi Nativity: Crocheted Mary and Baby Jesus


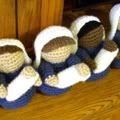
For Christmas this year, I made this amigurumi Mary and baby Jesus for my friends and family. My plan is to make a new pattern every year for a different figure (Joseph, shepherds, wise men, animals, angel, etc.) so that after several years they will have a complete amigurumi nativity scene. This is the first year I'm doing it so this is the only pattern I have come up with so far.


Amigurumi Pattern
Notes on this pattern:
  • My patterns are free and may not be sold. Please do not reproduce or repost patterns or instructions from CraftyCattery.com without my permission. For information on selling items created from my patterns, please view the FAQ.
  • There are a few color changes in this pattern. Aside from that, the most complicated part of the pattern to crochet is the swaddling, where you must switch from continuous crochet to flat crochet, and Mary's veil which is crocheted flat.
  • The finished size of the pair of figures is 5 inches.
Materials needed:
  • Bulky weight yarn in a flesh color, white (for veil and swaddling), and blue (for Mary's dress). I used Lion Brand Jiffy.
  • Size H (5.00 mm) crochet hook
  • Yarn needle
  • Stuffing
  • Optional: Bean bag plastic pellets. Putting some of these in the bottom of the Mary figure can help it balance better. Make sure the pellets are large enough that they won't work their way through the crochet stitches. Pellets are not recommended if small children may have access to the figure.
Abbreviations used in this pattern:
  • Rnd = round, when doing continuous crochet
  • Row = row, when doing flat crochet
  • sc = single crochet
  • st = stitch
  • sts = stitches
  • ch = chain
  • sc2tog = single crochet two stitches together, aka a decrease. (I recommend using falwyn's invisible decrease.)
The pattern:
Baby Jesus' Head
Using flesh color:
Rnd 1: 6 sc in magic ring (6 sts).
Rnd 2: 2 sc in each st around (12 sts).
Rnd 3: sc around (12 sts).
Rnd 4: [sc2tog] six times (6 sts).
Bind off, weaving in tail.
Baby Jesus' Swaddling
Using white:
Rnd 1: 3 sc in magic ring (3 sts).
Rnd 2: 2 sc in each st around (6 sts).
Rnd 3: 2 sc in each st around (12 sts).
Rnd 4: sc around (12 sts).
Rnd 5: sc around (12 sts).
Rnd 6: sc around (12 sts).
Rnd 7: sc around (12 sts).
Rnd 8: sc around (12 sts).
Rnd 9: sc around (12 sts).
Switch to flat crochet:
Row 10: sc in each st for 8 sts, ch 1 turn (8 sts).
Row 11: sc2tog, sc 4, sc2tog, ch 1 turn (6 sts).
Row 12: sc2tog, sc 2, sc2tog, ch 1 turn (4 sts).
Row 13: sc2tog, sc2tog. (2 sts).
Bind off, weaving in tail.
Swaddling, showing flat crochet at top:

Stuff the head and the swaddling. Put the open end of the head just inside the open end of the swaddling and sew them together.
Mary's Veil
Crocheted flat. Using white:
Row 1: ch 11. sc in second chain from hook. [sc in each chain] eight times (with first sc, a total of 9 sc). In 10th chain, 4 sc. Work back down the other side of the chain doing sc in each chain (total of 9 sc), ch 1 turn (22 sts).
Row 2: sc 9, 2 sc in next 4 sts, sc 9, ch 1 turn (26 sts).
Row 3: sc 9, 2 sc in next 8 sts, sc 9, ch 1 turn (34 sts).
Row 4: sc across, ch 1 turn (34 sts).
Row 5: sc across, ch 1 turn (34 sts).
Row 6: sc across, ch 1 turn (34 sts).
Row 7: sc across, ch 1 turn (34 sts).
Row 8: sc across, ch 1 turn (34 sts).
Row 9: sc across, ch 1 turn (34 sts).
Bind off, weaving in tails.
Here are some photos detailing how to start the veil.

Row 1 - Chain 11:
Row 1 cont'd - sc in second chain from hook. [sc in each chain] eight times (with first sc, a total of 9 sc):


Row 1 cont'd - In 10th chain, 4 sc:


Row 1 cont'd - Work back down the other side of the chain doing sc in each chain (total of 9 sc), ch 1 turn:


Row 2 - sc 9, 2 sc in next 4 sts, sc 9, ch 1 turn:


Keep working back and forth according to the pattern. Here is the final result:
Mary's Arm
Make two. Begin with flesh color:
Rnd 1: 4 sc in magic ring (4 sts).
Rnd 2: [2 sc in next st, sc 1] two times (6 sts).
Rnd 3: sc around (6 sts).
Color change to blue:
Rnd 4: sc around (6 sts).
Rnd 5: [2 sc in next st, sc 1] three times (9 sts).
Rnd 6: sc around (9 sts).
Rnd 7: sc around (9 sts).
Rnd 8: sc around (9 sts).
Rnd 9: sc around (9 sts).
Rnd 10: sc around (9 sts).
Bind off, leaving tail to use to sew arm to body. Stuff arm.
Mary's Head and Body
Beginning with flesh color:
Rnd 1: 6 sc in magic ring (6 sts).
Rnd 2: 2 sc in each st around (12 sts).
Rnd 3: [2 sc in next st, sc 1] six times (18 sts).
Rnd 4: [2 sc in next st, sc 2] six times (24 sts).
Rnd 5: [2 sc in next st, sc 3] six times (30 sts).
Rnd 6: sc around (30 sts).
Rnd 7: sc around (30 sts).
Rnd 8: [sc2tog, sc 3] six times (24 sts).
Rnd 9: [sc2tog, sc 2] six times (18 sts).
Rnd 10: [sc2tog, sc 1] six times (12 sts).
Color change to blue:
Rnd 11: sc around (12 sts).
Rnd 12: [2 sc in next st, sc 3] three times (15 sts).
Rnd 13: [2 sc in next st, sc 4] three times (18 sts).
Rnd 14: [2 sc in next st, sc 5] three times (21 sts).
Rnd 15: [2 sc in next st, sc 6] three times (24 sts).
Rnd 16: [2 sc in next st, sc 7] three times (27 sts).
Rnd 17: [2 sc in next st, sc 8] three times (30 sts).
Rnd 18: [2 sc in next st, sc 9] three times (33 sts).
Rnd 19: sc around (33 sts).
Rnd 20: [2 sc in next st, sc 10] three times (36 sts).
Rnd 21: sc around (36 sts).
Rnd 22: sc around (36 sts).
Sew arms to body underneath head. Stuff head and upper part of body (stuffing it partially now is easier than trying to stuff the whole thing as you are closing it up).
Rnd 23: [sc2tog, sc 4] six times (30 sts).
Rnd 24: [sc2tog, sc 3] six times (24 sts).
Rnd 25: [sc2tog, sc 2] six times (18 sts).
Rnd 26: [sc2tog, sc 1] six times (12 sts).
Stuff the rest of the body. Add plastic bean bag pellets if desired.
Rnd 27: [sc2tog] six times (6 sts).
Bind off, closing hole and weaving in tail.
Final Construction
Sew veil to Mary's head. Add hair if desired. Sew baby Jesus to Mary's hands. Enjoy!

Tuesday, December 01, 2009

Mini PVC Greenhouse for my Chiltepin Plants


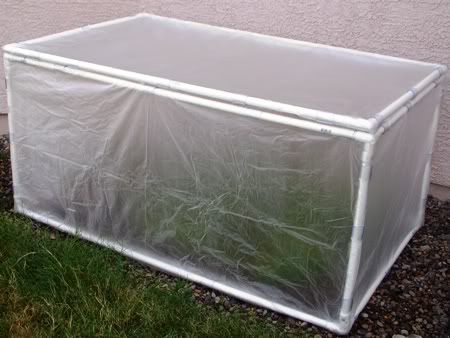
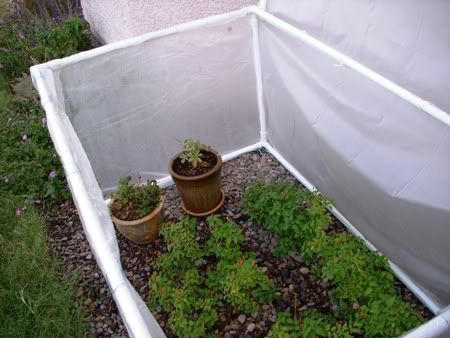
Last winter my chiltepin plants had a bit of a rough time - they all froze and only half of them came back in the spring. So this winter we thought we'd make them a mini greenhouse to help keep them from freezing again. It's made out of PVC pipes and old shower curtain liners, which are attached to the pipes with 2 inch lengths of vinyl tubing which have been split down one side*.


It has a hinged lid so we can get inside it and so we can leave it open during warm times. And since the shower curtain liners are translucent we can leave it shut if we go on vacation and the plants should still get enough light to survive (Christmas vacation is what did them in last year). Hopefully this will help my chiltepins make it through the winter!

* Update 12/4/09: The vinyl tubing does NOT work! Not in Arizona at least. Either the temperature change during the day or the strong wind pops the vinyl tubing off of the PVC pipes. For now we have replaced the vinyl tubing with duct tape (lots of it!) and we are looking into a product called Snap Clamps, which are made for holding plastic/fabric on to PVC pipes.

Related Posts: Quail Nest and Chiltepin Seeds, Chiltepin Plants Update 1, Chiltepin Plants Update 2

Sunday, November 29, 2009

Amigurumi: Crocheted Fruit Keychains

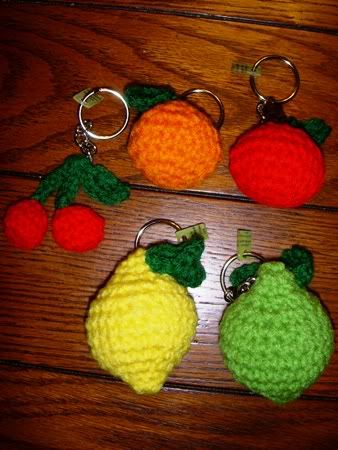
Ever heard of geocaching? It's a game where you use your GPS to find "caches" - containers of varying sizes - that have been hidden outside all over the world. Inside the container is a log where you sign your username to show that you've found it, and also sometimes there are trade items. You can take an item out of the cache as long as you leave another item of equal or greater value. Generally the items are small toys or random dollar store items. I thought it would be fun to come up with something different to leave in the caches that I visit, so I made these amigurumi crocheted fruit keychains.


They were a little difficult to photograph, but the fruits are (clockwise from left): cherries, orange, apple, lime, and lemon. The shapes are so simple that you don't really need a pattern for them. The cherries, orange, and apple are all simple spheres and the lemon and lime are spheres with a few extra rounds in the middle and the first and last rounds of six stiches repeated to give their ends the points. I did use a pattern for the leaves, it can be found on the blog Crochet and Other Stuff. You will also find a pattern for a crocheted apple there; I didn't use that exact pattern (my spheres had 24 stitches in their largest round) but what can I say, a sphere's a sphere!

I couldn't find any keychains for sale in my area so I just ordered some online. I got 50 of them for $13.50 which was a pretty good deal.

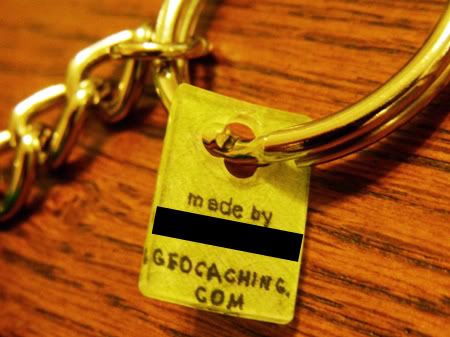
I also made little tags out of shrink plastic (aka Shrinky Dinks) to put on the keychains with the name of the website (geocaching.com) and my username (blacked out for privacy):


All in all, these were easy and quick to make and will hopefully be a fun thing to find for the next person who visits the cache!

Wednesday, November 04, 2009

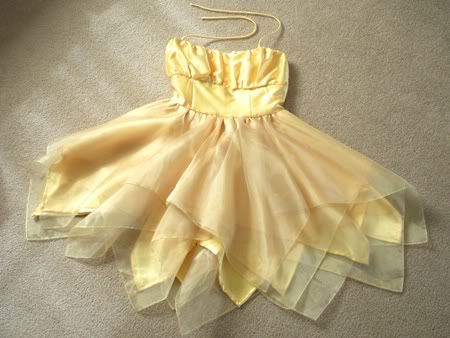
Wicked Costume: Glinda's Yellow "Emerald City" Dress


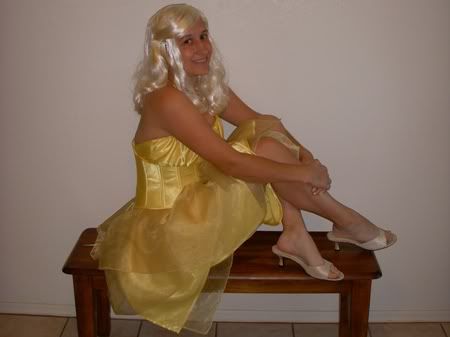
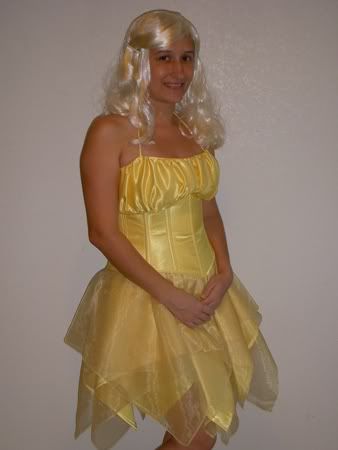
My Halloween costume this year was one of Glinda's dresses from the musical Wicked. Specifically, the yellow dress she wears to the Emerald City during the song "One Short Day."


First off, I have to give a big thanks to Corbyjane at the blog Pink Goes Good With Green! for her detailed post about this dress. Her collection of photos of this costume was a huge help! If you're not familiar with this dress, check out her post to see what I was trying to replicate.


Of course many of the trick-or-treaters that visited us on Halloween didn't recognize the costume. At first I tried to explain who I was but after getting a few odd looks I just said that I was a fairy!
The costume isn't a perfect match for the "real" Glinda dress but I think it's a pretty good replica considering I only spent about $30 and two weeks on it. It's missing the rhinestone and flocking embellishments of the original. I did buy rhinestones but ran out of time to glue them on and I couldn't figure out how to do the flocking. Hopefully if I figure it out, I can go back and add the embellishments to it later.

I'll cover each part of the costume in detail below.

***


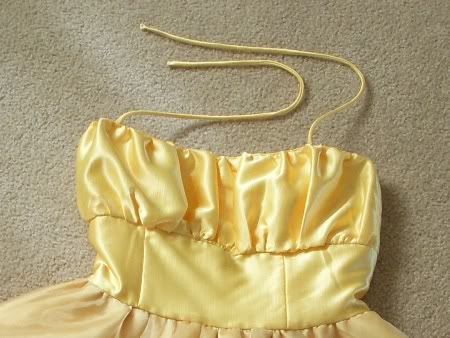
Project Name: Glinda's Yellow "Emerald City Dress" - Gathered Top
Time Taken to Finish: 2 days
Pattern: McCall 5380 Unfortunately this pattern has been discontinued, but I was able to find it on eBay for a pretty good price.
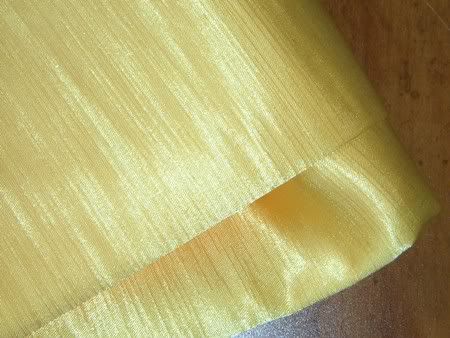
Materials Used: Yellow fabric with a sheen. I got lucky and found this fabric for $1.50 a yard in the clearance section at Wal-Mart. Here's a photo of the fabric up close:


You can see that the fabric has tiny little lines sewn into it. Cute!
What I Did: I followed the pattern closely (view A). The only change I made was to not connect the straps on the back - I tied them behind my neck instead. There is a zipper in the back of the dress, it continues down into the handkerchief skirt.
What I Liked About the Project: Having an actual pattern made this part of the costume easy to sew.
What I Didn’t Like About the Project: I really wanted the gathered part of the dress to be made of the same yellow organza that I used to make the outer layers of the skirt. I thought that was closer to how it was made in the original costume. Unfortunately after three attempts to make it with that fabric, I just couldn't get it to work. If I just gathered the amount of organza specified in the pattern it wasn't enough - the gathers were too far apart. I calculated that I would have to gather 8 yards of organza to get it the way I wanted and I didn't have that much fabric to spare! I made a few attempts at using an amount somewhere in between but it still didn't look right so I gave up and used the fabric I was using for the rest of the dress.

***


Project Name: Glinda's Yellow "Emerald City" Dress - Layered Handkerchief Skirt
Time Taken to Finish: 3 days
Pattern: I modified these instructions from the Weekend Designer blog
Materials Used: Three layers of yellow organza ($2 a yard at an odds-and-ends fabric store) and two layers of the yellow fabric that I used for the gathered top.
What I Did: Cut out the fabric into squares of different sizes and marked the center of each square. Piled them up with the smallest square on top and the largest on bottom, matching centers Rotated the layers around the center so they overlapped each other. Pinned the layers together at the center. Marked a circle on the top layer with a radius as suggested by Weekend Designer. Sewed a basting stitch through all the layers along that circle and then did it again about 1/2 inch outside that circle. Cut out the center of the circle, gathered the layers along the basting stitches and sewed it on to the gathered top.
What I Liked About the Project: This is a surprisingly easy skirt to make, it's just a lot of squares!
What I Didn’t Like About the Project: It's a little shorter than I would've liked but the length was limited by the width of the fabric I had (45 inches). If you wanted a longer skirt you would have to sew two widths of fabric together to make a bigger square.

***


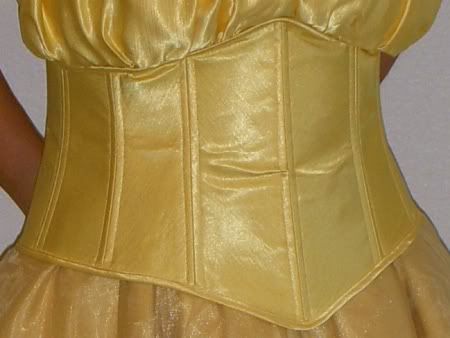
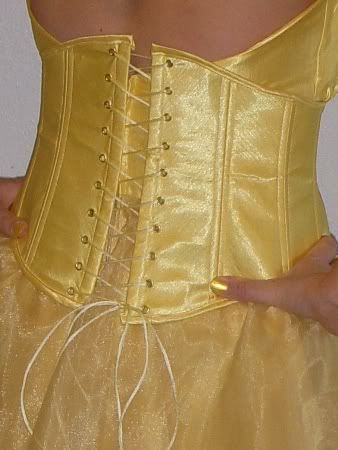
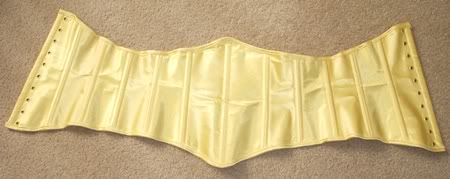
Project Name: Glinda's Yellow "Emerald City" Dress - Underbust Corset
Time Taken to Finish: 4 days
Pattern: Hand-drafted using these instructions from the Necromancer's Palanquin blog
Materials Used: yellow fabric, middleweight interfacing, 3/8" cable ties for boning, 5/32" gold eyelets
What I Did: After drafting the pattern, I cut out pieces from the yellow fabric for both the outside and the lining. I used some fusible webbing to attach the outside pieces to the interfacing. I sewed all the outside pieces together and all the lining pieces together. With the right sides of the outside and the lining facing each other, I sewed the two vertical edges together (along the edge where the eyelets will be going) and then turned it right side out. Next I basted the edges and then sewed 1/2" channels around each of the seams between the pieces. I inserted the boning and then used bias tape (made from the yellow fabric) to complete the unfinished edges. Finally, I put 10 eyelets on each side at the back.
What I Liked About the Project: This is the first corset I drafted by hand. It was pretty easy, it only took me about two tries to get the pattern right.
What I Didn’t Like About the Project: Making the bias tape myself was annoying but it was the only way to get it to match. I would definitely recommend using starch if you can when you're ironing the tape - it makes things a lot easier!

***

Glinda's Yellow "Emerald City" Dress - Accessories

The Wig:


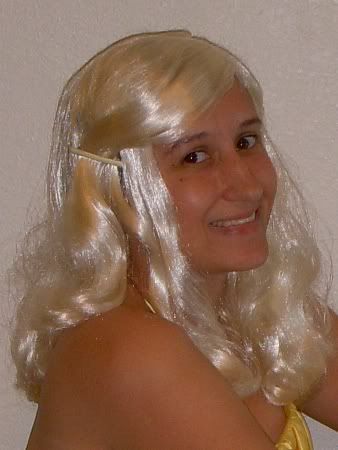
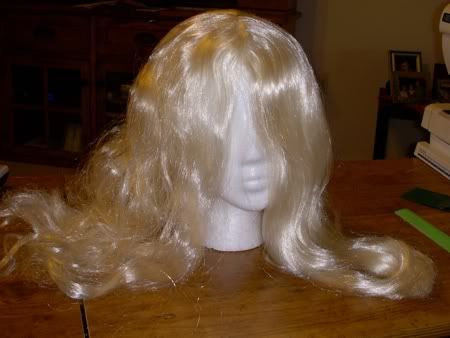
Originally I wasn't planning on wearing a wig, even though my hair is dark brown. But I got a haircut right before Halloween and my hair was way too short, I couldn't even curl it. I found this wig for sale for $6 at Wal-Mart. The color wasn't perfect (it was a little too white) but the price was right! I brushed it, cut it, and styled it with a curling iron on very low heat. You can see the difference this makes in the photo below. The hair on the right has been fixed while the hair on the left has not.


The Glasses:


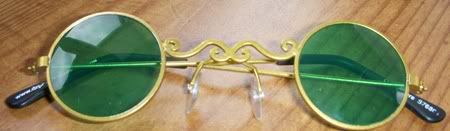
I didn't have $20 (plus shipping) to shell out for the authentic Emerald City glasses from the official Wicked store so I picked these up at a costume store. They're not the greatest, the lenses are far apart so they look kind of odd when you're actually wearing them.

Other Accessories:

I looked hard for some light-colored Mary Jane heels like Glinda wears but fall is just the wrong time of year to look for light-colored shoes! Instead I wore some old ivory heels that I bought to wear to a wedding a long time ago. I also tried to find a necklace and a purse like Glinda's but couldn't find anything close enough. I'll probably keep an eye out for all these things so I can eventually complete the costume.

Thursday, October 22, 2009

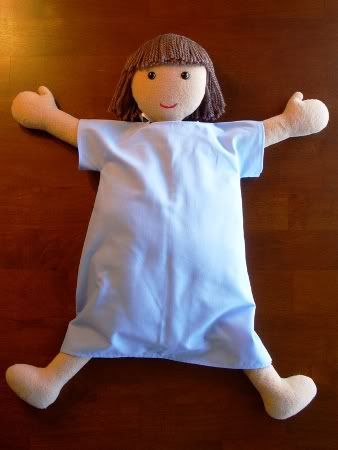
Anatomy Doll Pattern

Update: I've put together a free PDF pattern for this doll that you can download and print. It hasn't been tested so please let me know if you find any errors. And of course I would love to see any dolls you make, just post a link in the comments!

Well here it is, the top-secret project I've been working on for months!


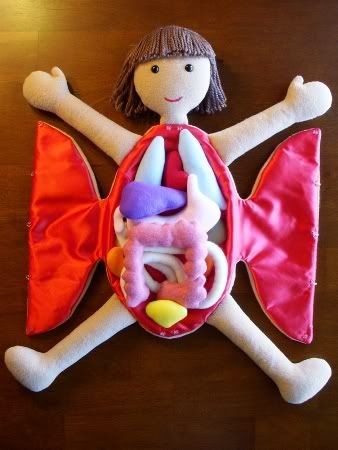
A little morbid, isn't it? It's an anatomy doll, made for a friend who is a medical student. Here's the doll wearing her hospital gown:


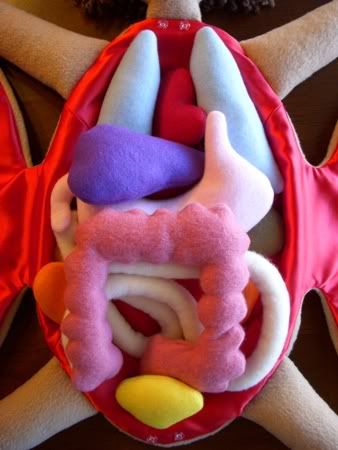
A close-up of the insides:


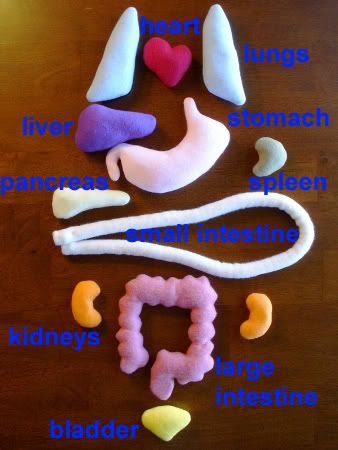
Here are all the organs:


The organs are the lungs, heart, liver, stomach, spleen, pancreas, small intestine, kidneys, large intestine, and bladder.

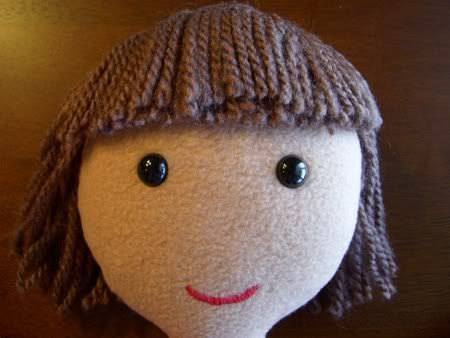
A close of up the face:


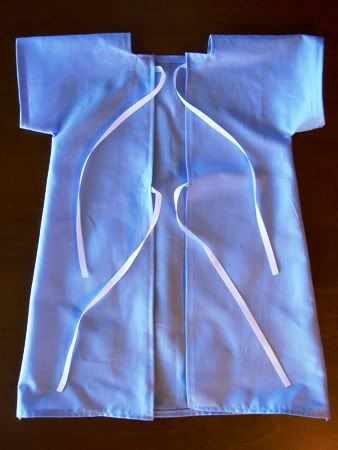
The back of the hospital gown:


Project Name: Anatomy Doll
Time Taken to Finish: 5 months, off and on
Pattern:
Made it myself, you can find it here
Notes on the Pattern: My patterns are free and may not be sold. Please do not reproduce or repost patterns or instructions from CraftyCattery.com without my permission. For information on selling items created from my patterns, please view the FAQ.
Materials Used: body and organs are made of fleece, hair is yarn, hospital gown is cotton
What I Did: I've been working on this doll intermittently since June. I started out with the organs since I needed to know how much space they would take up before I could make the body. Once I had them made I created the body to fit them. There are magnets in each of the organs and the inside of the body was lined with metal washers so the organs would stick to it. There are also magnets in ends of the stomach, small intestines and large intestines so they would stick to each other.

I haven't ever sewn a doll of any kind before so this was a challenging project for me! With all the experimenting I did, by the end I had created every part of the body at least two or three different times. But the final product turned out well and the medical student who got it seemed to like it so it was definitely worth all the effort. :)

Thursday, October 01, 2009

Word Cloud for The Crafty Cattery

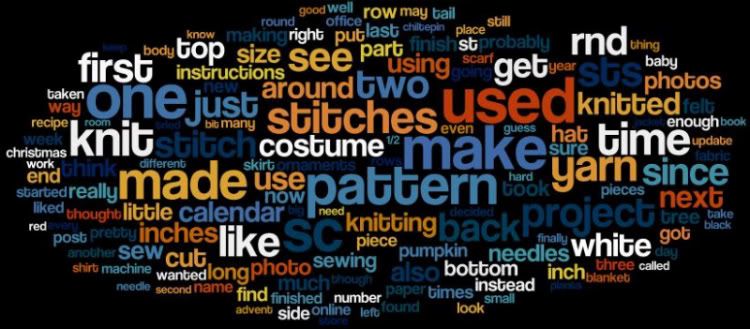
A word cloud showing the most used words in my blog

Thanks to Costume Queen for recommending Wordle.net! It lets you make these cool word clouds from your own text or blog. I started out making my word cloud using the Wordle's option to paste in your blog's URL but I found that it only picked up words from my most recent posts. So instead I copied all the text from my blog and then pasted into Wordle's text box.

It looks like "make", "used", and "one" are my most common words with "pattern", "made", "knit" and "stitches" close behind. It also looks like it picked up "sc" and "sts" from my crochet patterns, which I guess makes sense since those abbreviations are repeated a lot.

My blog has been quiet lately because I'm in the middle of a pretty complicated top-secret project! I'm trying very hard to finish it up in the next couple of weeks because I want to get started on my Halloween costume. Once it is done I will of course post photos here, so stay tuned!

Related Posts with Thumbnails