Monday, March 31, 2008

Pretzel Day!


I've been craving a soft pretzel for weeks now! I've always been too afraid to attempt making them myself - having to "use yeast" and "boil dough" seemed intimidating. But last night we caught a pretzel episode of Throwdown with Bobby Flay on the Food Network and it really didn't look all that scary. I hunted down a recipe online (from the illustrious Alton Brown, no less) and made my attempt. It wasn't as hard as I thought! Using yeast was easy (just a lot of waiting, basically) and boiling the dough wasn't any more difficult that boiling pasta. Unfortunately we couldn't find any pretzel salt to go on top so we used table salt which didn't taste quite right. I also wish that I had made them thinner so they wouldn't be as doughy in the middle. Anyway, they tasted pretty good for a first attempt and I also got to use the stand mixer I received for Christmas. Win-win!

Tuesday, March 18, 2008

Recovering Deleted Photos from Memory Cards

I neglected to mention in my previous post that I had a crisis when I returned home from my trip to the Arizona Renaissance Festival and tried to use Picasa (Google’s photo management software) to upload my photos. Picasa was supposed to copy the photos from my memory card, paste them into a folder on my computer, and then delete the photos from my memory card. Instead, it copied and pasted nothing, then deleted my photos anyway! Let me tell you, when I realized my photos were gone there were a few tears and a lot of yelling (aimed at my poor husband, who had the bad luck to be calling me at the time). I’m not sure whether I should place the blame on Picasa or my memory card, which every once in a while has given me a read error (but nothing that couldn’t be solved by taking the card out and putting it back in again). Regardless of who’s to blame, I know that from now on I’m not going to let Picasa automatically delete my stuff anymore!
To attempt to fix this, I first tried to get ahold of my computer-genius brother (doesn’t everyone have one?). But due to some St. Patrick’s Day partying he was not available so I resorted to Google. It took me a while to sort through all the recovery programs out there and I found that most of them weren’t free or looked untrustworthy. Finally I ran across an article in the New York Times that recommended a free downloadable program called PC Inspector Smart Recovery. It’s just for recovery from memory cards though the company, Convar, also offers other file recovery programs. I was a little worried about some of the poor English in the instructions (the company is based in Germany) but I tried it out anyway and it was able to recover all but one of my 40 photos!
I was so pleased that I then went on to see what pictures I could recover from the memory cards belonging to my husband’s camera. We lost all our photos from our Galveston, Texas honeymoon in a laptop crash over a year ago and I was hoping that some of them might still remain on the memory cards. I got lucky and did find a couple, though they were mostly blurry fish from Moody Gardens and moon rocks from NASA - unfortunately not the ones I really wanted. But they’re better than nothing!
The one key thing to keep in mind if you accidentally delete photos from a memory card is to not save any new photos on that card until you have done your recovery. With most memory cards the data from the photos is still there after you delete them. It’s only permanently gone when new data is written over the old data. So if we had tried this recovery soon after we lost our honeymoon photos we probably would’ve found more, but instead we waited until we had taken lots of new photos which overwrote the old ones. :( Oh well, I’m working on recovering the data from the crashed laptop’s hard drive so maybe I’ll get my pictures back that way!


Sunday, March 16, 2008

Scottish Wench Costume - Completed

We had a fantastic time at the Arizona Renaissance Festival! I was worried that we might be the only ones in costume because I’d heard from several sources that not too many visitors dressed up. But thankfully that was not true - we saw a large number of non-employees in Renaissance garb. Here’s a shot of me in my completed Scottish wench costume:
There was some discussion as to whether it was correct for me to lace the bodice from top to bottom instead of from bottom to top (apparently the way most wenches do it). But top to bottom was the way they had it in the pattern and, anyway, I didn’t want to bother trying to re-lace it during the festival.
I added a few features to the costume to help everything stay in place. I sewed two snaps at each of the shoulders to attach the bodice straps to the shirt. This kept the weight of the shawl and buckles from pulling the straps off of my shoulders, though instead it pulled on the the shirt. To keep the waistband of the skirt from slipping below the bottom of the bodice, I sewed a hook (from a hook and eye) to the inside of the bodice near each front side seam and sewed the eyes onto the waistband of the skirt.
This shot of the back gives you a better view of the shawl. It was an quick and easy sew. The way I’m wearing it is not the way the pattern suggested - they wanted it to be worn longways, with a belt at the waist to keep the excess from dragging on the ground. It just didn’t look right that way, so I ended up wearing it shortways instead.
For the details on how I made each piece of this costume, see my previous posts: Skirt and Shirt and Bodice.


Wednesday, March 12, 2008

Scottish Wench Costume - Skirt and Shirt

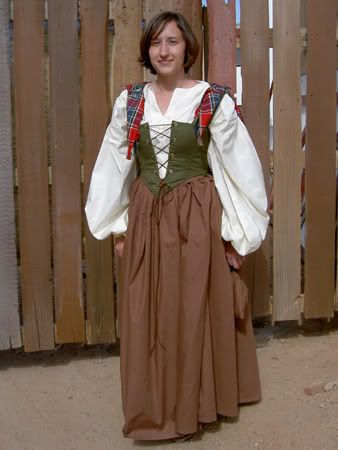
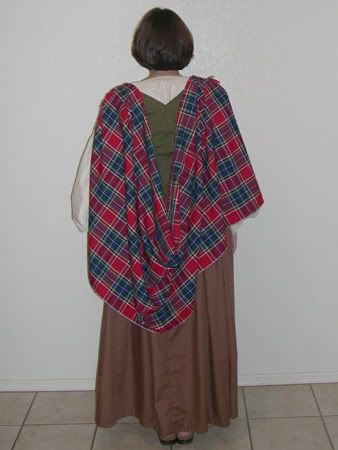
I’m in a rush to finish my costume because we're now going to the Renaissance festival several weeks earlier than planned! I’ve completed the skirt and the shirt; I still have to make the shawl and sew the final seams on the bodice/vest. When it’s all done I’ll post a picture of the completed outfit.


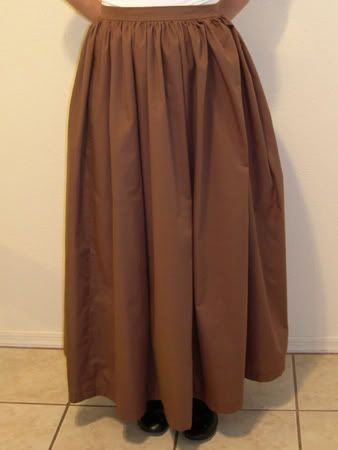
Project Name: Scottish Wench Costume - skirt
Time Taken to Finish: 2 days
Pattern: Simplicity 3623
Materials Used:
-brown 100% cotton quilting fabric
-matching thread
-9 inch brown zipper
-1 hook and eye closure
Special Tools Used: Viking Platinum 755Q sewing machine
What I Did: Pretty simple, just followed the pattern. I did have to hem the bottom more than they suggested or else I would’ve ended up walking on it!
What I Liked About the Project: Very quick and not too many pieces. And I finally learned to sew on a zipper correctly!
What I Didn’t Like About the Project: Again, I had problems in fitting the skirt. The first waistband I attached to the skirt was too small and I couldn’t zip it up, but when I made a second waistband in the next size up it was too big and won’t stay at my waist. I gave up and stuck with the second waistband though I may have to cinch it up somehow to keep it in place.


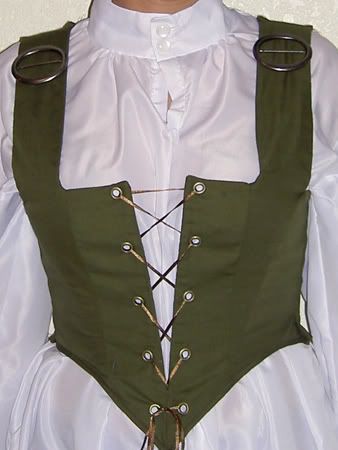
Project Name: Scottish Wench Costume - shirt
Time Taken to Finish: 3 days
Pattern: Simplicity 3623
Materials Used:
-cream 100% cotton sateen fabric
-matching thread
-2 do-it-yourself fabric-covered buttons
-fusible interfacing
-seam tape (itchy stuff!)
Special Tools Used: Viking Platinum 755Q sewing machine, buttonholer attachment, buttonhole knife
What I Did: Exactly what the pattern said, except I left off the lace/ruffles at the collar and sleeves and I again hemmed a bit more on the tail than they suggested.
What I Liked About the Project: Um, it’s not too small?
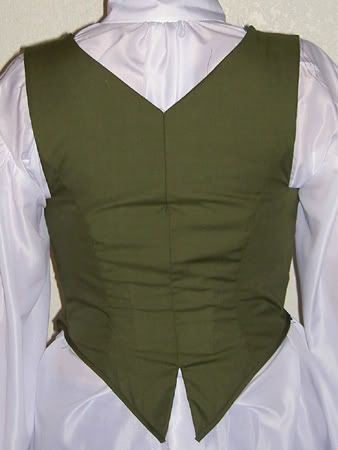
What I Didn’t Like About the Project: I’m not super happy about this shirt. There is way too much excess fabric, considering I have to tuck most of it inside a vest! I’m annoyed since this shirt was DESIGNED to go under the vest I made. Look at the size of the armholes and sleeves! I think it’s going to end up looking silly when I try to cram it under a vest and everything ends up poofing out the sleeves. But since the fabric to make this shirt cost more than all my other fabric supplies put together, I feel like I have to use it. Plus I really don’t have time to research and sew a new shirt. We’ll see, maybe it won’t end up looking so bad.
Links to the Bodice and the Completed Costume

Tuesday, March 04, 2008

Scottish Wench Costume - Bodice


I've never been to a Renaissance festival before though I've always wanted to go. Luckily enough, I've I found out that a friend who just moved here would like to go and she already has a costume! I'm always one to take advantage of any opportunity to dress up so I jumped at the opportunity to make another costume. The first piece I've finished is the bodice/vest. In the photo I'm wearing it over my Jack Aubrey shirt but I'm planning on making a new shirt in a cream color. Right now the shoulder and side seams are just basted so that I can make sure the bodice fits over the new shirt before I sew the final seams.

Project Name: Scottish Wench Costume - bodice/vest
Time Taken to Finish: 1 week
Pattern: Simplicity 3623
Materials Used:
-olive 100% cotton quilting fabric (couldn't find any colors or textures that I liked or could afford in the garment fabrics)
-matching thread
-1/4 inch eyelets
-2 inch belt buckles (to attach a tartan shawl to the vest - that's where the Scottish part comes in!)
-brown ribbon or leather (for lacing)
-3/8 inch plastic cable ties (for boning)
-muslin (sewn to lining to hold boning)
Special Tools Used: Viking Platinum 755Q sewing machine, eyelet tool
What I Did: For the most part I followed the pattern directions. Here's where I strayed from it:
-Instead of real boning I substituted 3/8 inch plastic cable ties which can be found at home improvement stores. I found this substitution suggested many places online for people who don't have access to specialty sewing shops.
-The pattern said to sew the side and shoulder seams before putting in the eyelets and lacing but I ended up doing the reverse because there was no way to keep the bodice tight while fitting it without the lacing.
-After fitting the bodice I had to take in more at the shoulder seams than was suggested since they kept falling down, and I had to take in the back seam a bit because it kept gaping.
What I Liked About the Project: Substituting the cable ties for the boning worked out well. I think they're actually stronger than real plastic boning (which seemed flimsy when I finally found it in a store) and it's washable unlike metal boning.
What I Didn't Like About the Project: This is the kind of project that makes one see the necessity of a dressmaker's dummy or at least a competent fitting assistant! It took me two days to get the bodice properly fitted because I had trouble holding it in position and pinning it at the same time. I'm still unsatisfied with the wrinkles in the fabric on the back of the bodice but I'm not sure what's causing them. I also would like to use leather for the lacing instead of ribbon, but the leather I originally used smeared dye onto my Aubrey shirt (thankfully it came out) so I want to find some that will not make a mess.
Links to the Skirt and Shirt and the Completed Costume.

Related Posts with Thumbnails