
Update: I've put together a free PDF pattern for this doll that you can download and print. It hasn't been tested so please let me know if you find any errors. And of course I would love to see any dolls you make, just post a link in the comments!
Well here it is, the top-secret project I've been working on for months!
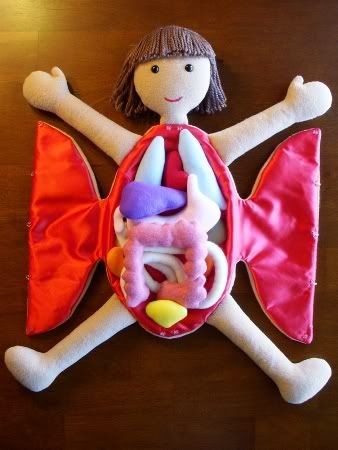
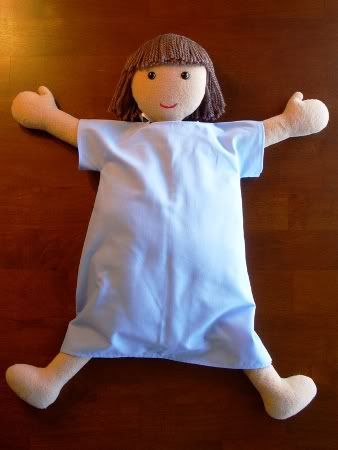
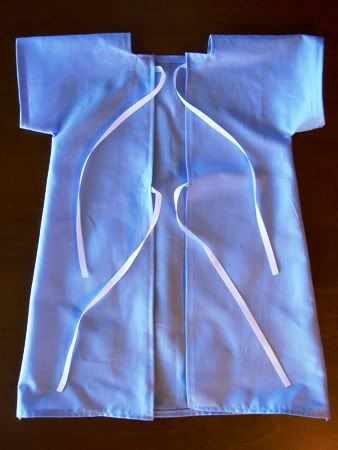
A little morbid, isn't it? It's an anatomy doll, made for a friend who is a medical student. Here's the doll wearing her hospital gown:
A close-up of the insides:
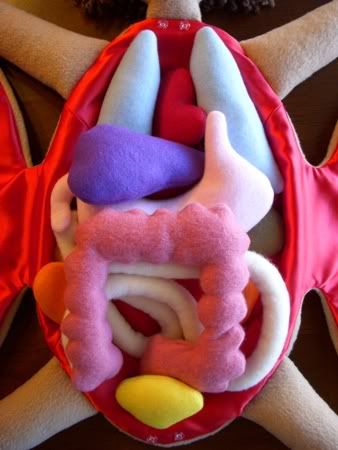
Here are all the organs:
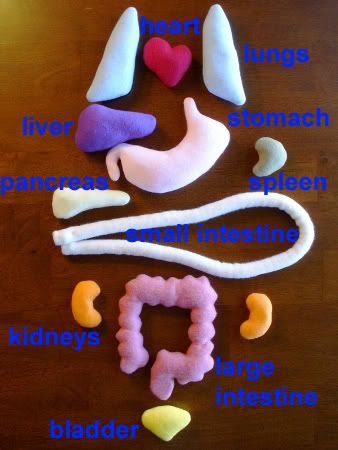
The organs are the lungs, heart, liver, stomach, spleen, pancreas, small intestine, kidneys, large intestine, and bladder.
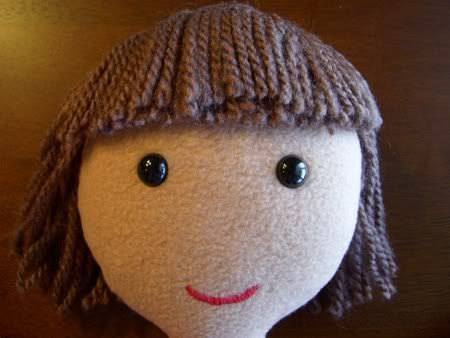
A close of up the face:
The back of the hospital gown:
Project Name: Anatomy Doll
Time Taken to Finish: 5 months, off and on
Pattern: Made it myself, you can find it here
Notes on the Pattern: My patterns are free and may not be sold. Please do not reproduce or repost patterns or instructions from CraftyCattery.com without my permission. For information on selling items created from my patterns, please view the FAQ.
Materials Used: body and organs are made of fleece, hair is yarn, hospital gown is cotton
What I Did: I've been working on this doll intermittently since June. I started out with the organs since I needed to know how much space they would take up before I could make the body. Once I had them made I created the body to fit them. There are magnets in each of the organs and the inside of the body was lined with metal washers so the organs would stick to it. There are also magnets in ends of the stomach, small intestines and large intestines so they would stick to each other.
I haven't ever sewn a doll of any kind before so this was a challenging project for me! With all the experimenting I did, by the end I had created every part of the body at least two or three different times. But the final product turned out well and the medical student who got it seemed to like it so it was definitely worth all the effort. :)


23 comments:
that's sooo cool! i think you should make a couple and sell them on etsy. i think any toddler to med student would get love it...or maybe that's just those with my genes.
Thanks! I'll have to think about that, I need to simplify the pattern first before I try to make more.
That is so creepy and adorable at the same time!!! It looks GREAT. What a neat idea. I agree with MKDWilson - you should make some more and sell them!
Glad you like it! I'll definitely have to think about selling them.
Mighty kewl!
Thx! ;)
Oh my goodness! So cute! I love your blog - going to have to share it with my mom, she's a quilter!
When I saw your Anatomy Doll I couldn't belive it. I'm a teacher and I'm trying to get things for a body system study. I wanted to make big models so students could get excited to more about them. I would love to buy a little Anatomy doll for my class or if you won't be making more if you wouldn't mind letting me know how you created the organs. I know you used felt but was everything sewn by hand? or with glue? I was going to make mine with buthcher paper and stuff them so they could look 3-D but having a little doll so the students can explore and learn each organ's name would be awesome.
Thank you! I wish I had time to make another one but I have too much going on right now. I have seen one similar doll for sale made by a foreign toy company. It's called "Erwin The Little Patient". You might try Googling it and see if you can find it for sale (though you may have to buy from overseas).
I sewed the organs with my sewing machine. Most of them were made of two pieces of polar fleece that were attached to fusible interfacing (this makes the fleece easier to sew and less likely to pull apart). You could use felt and interfacing instead, it should work. I sewed them with the right sides together and left a little hole so I could turn them right side out. I trimmed the edges, turned it right side out, stuffed it, then sewed the hole closed by hand.
I hope this helps! Let me know if you have any other questions. :)
I am a first time daddy and my son is now a toddler. I have been racking my brains trying to figure out creative toys that would be fun and educational at the same time. I stumbled across your anatomy doll by doing a google search for plush anatomy dolls for toddlers. I agree with other posters that these should be sold. You did an amazing job and it is just so darn cute.
Thanks, anonymous! I keep thinking about trying to sell some of the stuff I make but it is just such a big can of worms. I ought to do a post about it sometime. Anyway, I am considering making the pattern available but that will be a lot of work too (ex. the doll is probably 2 feet tall - how do I get the pattern to fit on a piece of paper so people can print it?).
Just wanted to let anyone following the comments know that I have put together a pattern for this doll, you can find the link at the top of the page.
Somewhere I'm missing the part about putting the washers in the body. How/where/when in the pattern do you do that?
I left that out because the magnets didn't work that well and I don't recommend using them (except maybe to attach the stomach and intestines to each other). There were several layers of fabric between the magnets and the washers in the body and the attraction was fairly weak. It was not enough to keep the organs in place if the doll was held vertically, so it's not worth the trouble.
If you want to attach the organs to the inside of the body cavity, I recommend using velcro. You can sew the hook side to the organ and the fuzzy side to the inside of the body cavity where you want the organ to go. I'd suggest sewing the velcro to the red body cavity piece before the doll is assembled so your stitches will be hidden inside.
Hopefully that makes sense. Let me know if it doesn't or if you have and other questions. :)
This is soooo cool! Thanks!
Do you think it would work with flannel?
It would probably work with flannel and most kinds of non-stretch fabric.
So I made one! But it came out kind of floppy :( and the body looks very large for the appendages. I have a zipper closure for the middle but might see up the bottom and top some so it closes more.
Cool! I'm happy to hear that you made one! That's a good idea to close up the bottom and top a little more to keep things inside.
i think this is the coolest doll ever, but I want a life size one :)
what kind of magnets did you use? I like that idea, as I'd hate to have the organs spilling all over the place!
It's been a while, but I believe the magnets were flat circular ceramic magnets. They weren't super strong though, because there were two layers of fabric between the magnets and the metal washers sewn into the back of the doll. They wouldn't stay in place if the doll was picked up and held by her arms, for example. I think velcro might be a bit more secure if you want to be sure the organs aren't falling out every time the doll is moved.
Love this project!
Post a Comment