
Camouflage Hat
I'm back from vacation and I thought I'd do a little write-up on the projects I knitted as Christmas gifts. The first was a camouflage hunting hat for my brother John:

This hat was knit following the directions for Crazy Aunt Purl's Roll-Brim Hat. I've knitted with this pattern before to make a roll-brim hat for myself (see November 17, 2006 blog entry). This time was a little different since I was knitting with a lighter weight yarn and smaller needles. The yarn I used was Bernat Camouflage in Renegade (medium weight) with a size 8 circular needle. I cast on 80 stitches (my gauge was about 3.5 stitches per inch - the hat was about 23 inches in circumference), knitted until the hat was about 7 inches long, then decreased my stitches until the hat was small enough to close. At the last possible moment (when I could no longer use the circular needle) I put the stitches on size 10 double-pointed needles since I didn't have any size 8. There was no noticable difference in stitch size since I only used the double pointed needles for a few rows.
Tea Cozy
After finishing the hat, I began searching for a pattern for a tea cozy for my father. He sent me a photo of the teapot and its dimensions for me to work from - I also had a teapot of my own that was similar in size (about 5 inches tall and 20 inches in circumference). I found a lot of patterns online for tea cozies, but none that I thought I could manage with my limited experience. I tried to start one or two, but became very frustrated with trying to determine what size to make and how to do the fancy stitches needed.
I then had a eureka moment! I pulled out the roll-brim hat I had just knitted for my brother - if the hat had two slits going up the sides and opposite each other, it would make a perfect cozy for my dad's teapot! So I modified Crazy Aunt Purl's Roll-Brim Hat design and made this:
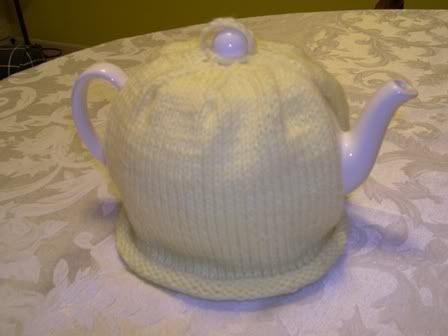
Not the fanciest tea cozy ever, but functional! Here's what I did:
1. Cast on 80 stitches. This is the same number of stitches as the camo hat I knit, and with my gauge on size 8 needles (about 3.5 stitches per inch) this gives a final product with about a 23 inch circumference. This is 3 more inches that the circumference of the teapot to give a little room to put the cozy on. Also remember that the slits let the cozy stretch a bit in the middle as well. Refer to Aunt Purl's instructions to get the correct number of stitches to cast on for your gauge or teapot size.
2. Knit in the round for 10 rows using a regular knit stitch. This brought the knitting to the bottom of the handle of the teapot. Remember to let the brim of the cozy roll when you are measuring it, since it will be rolled in the final product.
3. Now split the stitches half and half. Leave 40 stitches on the needle, and put the other 40 on a stitch holder. Be sure to split the stitches starting from the beginning of your round. The stitches that you leave on the needle should include the last stitch you knitted (so it has the yarn going to the ball coming from it). This split will be the start of the slits in the sides of the cozy. You will knit the two sets of stitches separately and then joint them back together at the top of the slits.
4. This is the tough part - at least it was for me! Knit the first 40 stitches back and forth for 30 rows in a stockinette stitch (knit one row, purl one row). You are no longer knitting in a circle - you are now knitting the first of two flat panels. You may need to knit more rows if your teapot is bigger, or fewer if it is smaller - knit until the panel is long enough to go over the handle and spout. Just make sure to do an even number of rows and to write down how many rows you did so that you can do the same on the other panel.
Technically you do not have to knit in a stockinette stitch if you don't want to. If you use a regular knit stitch instead, the only difference will be that the stitches in your 30 rows in the flat panels will look differently than the stitches in the circularly knitted rows. No big deal!
If you do decide to use a stockinette stitch, make sure that the first row you knit flat is done with the opposite stitch used in the last row knitted circularly. So if the last row knitted circularly was with a purl stitch, the first row knitted flat should be with a regular knit stitch (and vice versa). If you can't tell the difference between a knit stitch and a purl stitch after they've been knitted (like me!), just do a couple of stitches with the knit stitch and see if the look of those stitches matches the look of the stitches in the circularly knitted rows. If they do, you need to knit the rest of the row. If they don't, you need to undo those stitches and purl the row instead. Write down whether you knitted or purled the first flat row so you don't have to figure it out again with the next panel! And if you can't figure it out at all, just use a knit stitch for the whole thing.
5. After you have knitted the 30 rows in the first flat panel, transfer those stitches to a new stitch holder. Cut the yarn off at the end of the stitches, but leave a long tail so the stitches will not come unraveled while you are knitting the other panel.
6. Transfer the 40 stitches from the original stitch holder back on to your needle. You will then need to join the yarn from the ball to these stitches so you can knit them. This part can also be difficult. Here's how I did it:
a. Leaving a tail of about 5 inches, knit (or purl, depending on what your first row of stitches will be) the first stitch.
b. For the second stitch, instead of knitting (or purling) with the yarn from the ball, take the tail you left and knit (or purl) it into the second stitch.
c. From the third stitch on, go back to knitting (or purling) with the yarn from the ball.
This method of joining keeps the tail of the yarn from hanging out at the end of the row (I think I saw someone do this on the TV show Knitty Gritty). Once you have knitted several rows, you can go back and use a yarn needle to tie off the tail on the inside of the cozy.
7. Knit the second panel until you have the same number of rows as the first panel. Don't cut your yarn!
8. Transfer the 40 stitches for the first panel from the stitch holder to the needles. You should now have all 80 stitches on your circular needle. Make sure that the last stitch you knit on the second panel is at one end of the circular needle (the last stitch will have the yarn from the ball going from it). At the other end of the circular needle should be the stitches from the first panel. Make sure nothing is twisted, then join the two panels together - using the yarn coming from the last stitch of the second panel, knit the first stitch of the first panel on the other end of the circular needle. Knit the entire row circularly, stitching the other slit togther in the same manner when you come to it.
9. At this point my cozy was tall enough for me to start decreasing. To decrease (when you have 80 stitches), you can knit 8, then knit two together. On the next row, knit 7 then knit two together. Then knit 6, knit two together. Continue decreasing until you have 8 stitches left on the needles (you may need to switch to double-point needles before you can get to this point).
10. Close off the stitches by cutting off the yarn and using a yarn needle to thread it through the remaining stitches. If your teapot has a knob on the top, you might leave room for it to stick through the top (like I did). Tie off the yarn on the inside of the tea cozy. Also, go back and tie off the yarn that was left hanging from the top of the first panel. Weave in all the loose tails of yarn into the inside of the cozy. And, if you'd like, you can attach a loop to the top of the cozy for easy removal.
I know it sounds pretty complicated, but for me it was a much easier way to create a tea cozy than any of the other knitting patterns I could find!


1 comment:
I featured this post today on my tea lovers' roundup
http://muffinsnmore.blogspot.com/2010/09/project-16-cute-knitted-teapot-cozy.html
:-)
Have a great weekend!
Post a Comment