
Here's my latest knitted project - a tank top I designed myself. I finished it several weeks ago but I didn't post it because I wanted to write up detailed instructions for it. I've been sitting at the computer for the past two weeks and I can't seem to do it! It's not that it was that difficult to knit; it's just difficult to explain in writing. When I sat down at the computer I would end up writing only one or two lines of instruction before I would get stuck and end up staring at the screen for an hour. I finally decided that my time could be better spent actually knitting something! So I'm not going to provide detailed instructions, just some general information on how I knitted it.
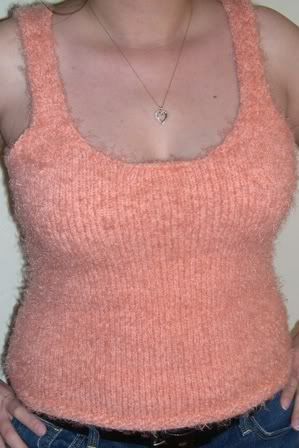
Front of Tank Top
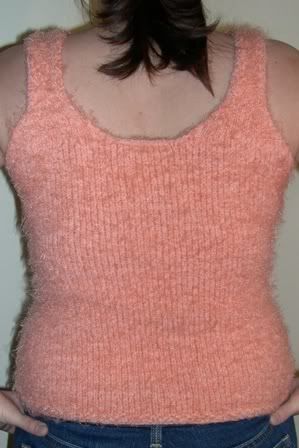
Back of Tank Top
Project Name: Cathy's Easy Knit Tank Top
Time Taken to Finish: 1 month (I was knitting intermittenly - I was having eye trouble and couldn't knit much some days)
Type of Yarn Used: Yarn Bee Cameo in Seashell
Amount of Yarn Used: About 2 1/2 skeins (each skein was 142 yards/3.5 oz)
Needles Used: US size 7 circular needles (36 inches long)
What I Liked About the Project: Almost all of the knitting was in stockinette stitch, which is very easy to do when knitting in the round. The tank is cute, fits well, and is very soft!
What I Didn't Like About the Project: I did not make the bottom border wide enough - it was only half an inch wide and the "curl" of the stockinette stitch causes it to flip up sometimes. Even though it's a tank top, the yarn is so heavy it will probably be too warm to wear in the summer. I'll probably end up wearing it to sleep instead. I may even make a pair of shorts to match!
Here's what I did to knit it:
1. After knitting a gauge swatch, I cast on the number of stitches I needed at my hips and joined them in the round.
2. I knit a 1/2 inch border of knit one, purl one rib. If I did it again I would knit at least a 1 inch border. If you look at the photo you will probably notice that my border doesn't look like a knit one, purl one rib. This is because I messed it up and purled one then knitted one on alternate rows.
3. I switched to stockinette stitch and began decreasing stitches evenly so that, by the time I had knitted 7 inches, I had the correct number of stitches I needed for my waist.
4. I then began increasing stitches so that, by the time I had knitted another 7 inches (for a total of 14 inches,) I had the correct number of stitches I needed for my bust.
5. I bound off the arm holes and the neck hole (front and back) and knit the four straps individually (right front and back straps, left front and back straps).
6. I used Kitchener stitch to connect the front and back straps, and then weaved in all loose ends. Done!
By the way, I'm re-reading all the Harry Potter books in preparation for this July! With the new movie and the final book due then, it promises to be an exciting month!


