Sunday, December 23, 2007

Merry Christmas!


Just a quick post to wish everyone a Merry Christmas! It took 30+ shots, but we finally managed to take an acceptable photo of our first real Christmas tree. We haven't collected many interesting ornaments yet so we just bought a lot of balls (not very exciting, but they do the job!).

I've been working on my first major project with my new sewing machine and I think I've bitten off more than I can chew! I can't say more than that right now since it's a gift for a friend but, assuming I'm able to finish it (and I'm not too embarrassed by the finished product!), it will probably be my first post of the new year!

Non-crafty website of the day: The Flick Filosopher. This is the website of MaryAnn Johanson, a film critic from New York City. I'm always on the lookout for critics who share my taste in movies, and when I read her review of Master and Commander I knew she had excellent judgement! We only seem to differ when it comes to Judd Apatow films - she hates them, I like them.

Thursday, December 13, 2007

Furoshiki - Japanese Cloth Gift Wrap


Prompted by an article in Shojo Beat magazine, I decided to use furoshiki to wrap gifts to my family this Christmas. Furoshiki, originally from Japan, are reusable cloth squares of various sizes that are used to wrap objects.
To make my furoshiki I used an inexpensive cotton fabric in a pattern that was not too Christmas-y, so they could be used again for other holidays or birthdays. I started out sewing them using instructions from a blog called Mommy Cooks. But hemming so many squares was taking forever (fold, press, fold, press, unfold, clip, fold, press, sew!) so I switched to sewing a straight stitch near the edge of the square and clipping close to it. Not as neat, but much faster!
I have also discovered that bandanas/handkerchiefs make good furoshiki for smaller items, though they can be a bit more expensive than making your own. You can find them at craft stores or even Wal-mart, which usually puts out Christmas-themed bandanas before the holidays in the purse section. At Wal-mart they're normally $1.00, but because they're not kept with the rest of the Christmas items in the store they often go unnoticed and there are usually a lot left by the time they have their 75% off after Christmas sales. I can pick up whatever they have left for $0.25 each.
To fold and tie the furoshiki, I followed an instructional sheet (in English) from the Japanese Ministry of the Environment. I then made an easier-to-print version of the instructional sheet (the original is white text on a green background) and included a copy when I mailed my gifts, so the recipients would be able to reuse the furoshiki.
As you can see from the instructional sheet I used the Otsukai Tsutsumi (basic carry wrap) for most of the gifts, but I was able to do the cool-looking Hon Tsutsumi (two books carry wrap) for one gift!

Monday, December 10, 2007

Quick Hanging Christmas Card Holder


I made this hanging Christmas card holder Friday afternoon - mostly on my back patio, as you can tell from some of the photos in the instructions!

Project Name: Quick Hanging Christmas Card Holder
Time Taken to Finish: 1 hour
Materials Used: 10 clothespins, 6-7 feet of decorative gold cord, gold spray paint, 10 miniature ornaments
Special Tools Used: hot glue gun
What I Liked About the Project: Super fast!
What I Didn't Like About the Project: If I did it again I might use red or green spray paint (or both!). The gold doesn't stand out as much as I would've liked - it almost looks like I didn't paint them at all.

Instructions:

1. Spray paint the clothespins.


I wanted 10 pins for my card holder, so I sprayed 12 pins (in case I messed up). Feel free to make more if you want a longer card holder. Be sure to paint all sides of the pins and let them dry thoroughly.

2. Use the hot glue gun to attach the miniature ornaments to the clothespins.


The ornaments I used

They look like they're made of Sculpey. If you can't find miniature ornaments you could also use fake holly or other small Christmas decorations. After removing the hangers from the ornaments, run a bead of hot glue down the back of the ornament and then place it on the clothespin (the mouth of the pin should be facing down). Once it is in place, press the ornament to the clothespin firmly and hold until it has cooled.


Ornament glued to the clothespin


All the completed clothespins

3. Tie the clothespins to the cord, about 6-7 inches apart. You don't have to tie them on, but if you're using a thin cord like I did they may slide around. If you do tie them on, make sure that the decorated sides of the clothespins are all facing the same way.


Clothespin tied to cord

4. Finally, tie a loop at each end of the cord and use thumb tacks or nails to hang your Christmas card holder from the wall!

Thursday, December 06, 2007

Peppermint Felt Christmas Tree Skirt


Here's a very basic Christmas tree skirt I finished today, along with my poor lumpy fiber optic tree. I was going for a peppermint-stripe effect!

Project Name: Peppermint Christmas Tree Skirt
Time Taken to Finish: 3 days
Materials Used: at least 2 yards of white felt, less than 1 yard of red felt, white thread, read thread
Special Tools Used: sewing machine
What I Liked About the Project: The sewing went really fast with my new machine.
What I Didn't Like About the Project: Arranging the stripes on the skirt - it took forever to get them spaced correctly.

Instructions:

1. Cut a large circle out of the white felt (as big as possible). To do this, I followed steps 1 and 2 of these tree skirt instructions on Howstuffworks.com. I would recommend practicing the circle-cutting technique on some paper or scrap material first, until you are sure you can do it correctly. The first few times I tried it on a piece of paper I messed up badly. Once I ended up with two half circles and another time I ended up with two identical smaller circles! Once you have cut out the large circle, keep it folded for the next step.

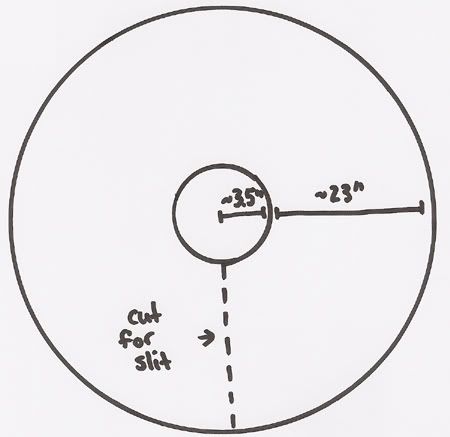
2. With the large circle still folded, use the same technique from the step above to mark and cut out a circle with 3.5 inch radius in the center of the large circle. This will be where the trunk of the tree goes.

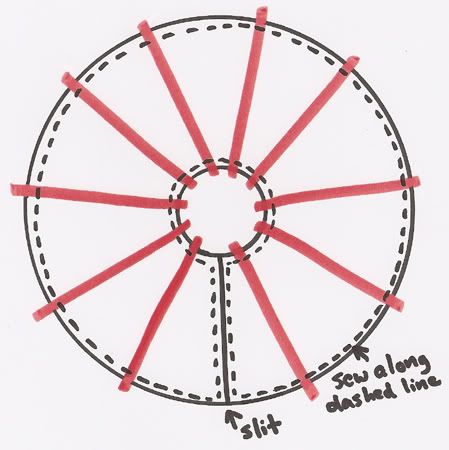
3. Use a ruler to mark a straight line connecting the outer edge of the skirt to the hole in the middle. Cut along this line to make a slit so the skirt can be opened up. Now you have a basic solid-color tree skirt (note that none of my diagrams are to scale):


4. Cut out inch-wide stripes from the red felt. They need to be long enough to go from the outer edge to the hole in the middle, with a couple of extra inches so you have some room to work with. In my skirt this distance was about 23 inches so I made my stripes about 26 inches long. Since the yardstick I have is about an inch wide, I just lined up one side of it with an edge of the felt and then cut down the other side. Cut out as many stripes as you'd like - I made 15.

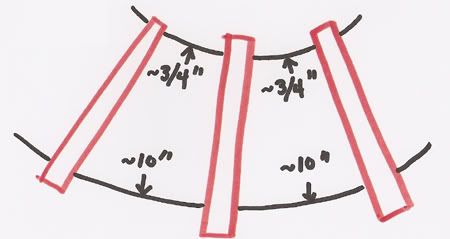
5. Pin the stripes on the skirt. For me this was the hardest part! It took a long time to space them evenly. They are spaced about .75 inches (3/4 of an inch) apart at the top and about 10 inches apart at the bottom. Pin the stripe to the skirt, making sure that you have an inch or so of stripe overhanging the skirt at both the top and bottom.


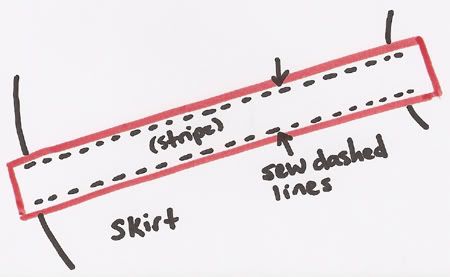
6. Sew down the sides of each stripe, but do not sew across the top and bottom yet. I used white thread to sew a zig-zag on each side of the stripe. Trim your threads (but not the excess red felt yet!).


7. After all the stripes are sewn down, use red thread to sew around the entire inner and outer edges of the skirt (see diagram). Again, I did a zig-zag stitch. This will give the skirt a decorative edge as well as sewing down the tops and bottoms of the stripes. Trim your threads, then trim the excess red felt so that the edges are even with the edges of the skirt. You're done!

Tuesday, December 04, 2007

My new sewing machine!


My new sewing machine is a Viking Platinum 755 Quilt. I bought it at a store called Sew What's New in Las Cruces, New Mexico (they also have a store in El Paso). Even though it was heavily discounted (because most of the Platinum line is being replaced with the Sapphire line), it still cost twice as much as we were planning to spend! Hopefully it will end up being worth it.

Before I actually visited any shops my two top choices for manufacturers were Viking and Bernina. But after seeing dealers for both, I found that the Bernina machines were more expensive and had fewer of the features that I wanted. At the Viking store I was torn between the Emerald 183 and the Platinum 755 Quilt. They had almost identical features and the prices were pretty close (the Emerald was a bit cheaper). I eventually decided on the Platinum 755, mainly because it was manufactured in Sweden and has a 20 year warranty (the Emerald 183 was made in Taiwan and had a 10 year warranty).

Roni Hardin, one of the owners of Sew What's New, must have spent over 3 hours helping me pick this machine and then showing me how to use it. I even came to her with a page of questions I thought of while researching on the internet and she very patiently answered every one. If you're looking for a sewing machine in the Las Cruces/El Paso area I would definitely recommend visiting her store!

Now that I have my new machine, I can finally finish the Christmas tree skirt I started last week. I'll do a post about it as soon as it's done.

Crafty blog of the day: Property of Kelly. Written by a graphic designer, it features her adorable illustrations as well as the occasional craft or cooking project.

Related Posts with Thumbnails